

I used to think weeknight dinners had to be boring, but then I unlocked the secret to extreme flavor and crunch. Prepare yourself, because you are about to experienceThe Best Crispy Dill Pickle Parmesan Chicken.
This dish is the shocking, delicious answer to dinner fatigue, delivering a savory, cheesy, and powerfully tangy bite that changes everything you know about chicken.
- Unbeatable Texture:Achieve a ridiculously crispy exterior thanks to the clever breading technique, ensuring every bite delivers an audible crunch.
- Bold Flavor Profile:The intense brine of the dill pickles perfectly cuts through the rich, salty notes of the Parmesan, creating addictive contrast.
- Quick and Easy Prep:Despite tasting complex, this recipe requires minimal active time and uses pantry staples you likely already have on hand.
- Family Dinner Hero:Versatile enough to be served as strips for snacking or whole cutlets for a hearty, satisfying weeknight meal everyone will request weekly.
Why This Recipe Changes Everything
Let me tell you a story about culinary bravery. My friend Gary, a self-proclaimed “texture purist” and hater of all things vinegary, scoffed when I told him I was marinating chicken in pickle juice. He predicted disaster, calling it “culinary anarchy.” But I knew the power of the brine. Pickle juice is nature’s most overlooked tenderizer, a salty, acidic liquid that transforms boring chicken breasts into succulent, flavor-packed cutlets. The secret is letting the chicken soak up that tangy goodness, which ensures the meat stays juicy long after it hits the heat.
The true genius, however, lies in the crust. We are not just slapping on standard breadcrumbs here. We are creating a fortified, flavor-bombed armor for the chicken. By combining Panko crumbs—the undisputed king of crunch—with deeply savory Parmesan cheese and dried dill, we build a complex layer that crisps up beautifully in the oven or air fryer. When Gary finally took a bite, his eyes widened with confusion and delight. He tried to maintain his disdain but failed miserably, declaring, through a mouthful of crunchy chicken, that this recipe was an absolute triumph. If this dish can convert a pickle skeptic like Gary, imagine what it will do for the rest of your family.
MakingThe Best Crispy Dill Pickle Parmesan Chickenrequires embracing the seemingly strange combination of dairy and dill, but trust the process. The acidity in the marinade acts as a counterpoint to the richness of the cheese, balancing the flavors into a harmonious, irresistible bite. This recipe is also perfect for those busy Tuesday nights when you need a dinner that feels like a weekend indulgence but takes less than an hour from prep to plate. Plus, it is endlessly adaptable; you can easily transform leftovers into sandwiches or chop them over a crisp salad the next day.
Understanding the Magic: Pickles and Parmesan
To truly master this recipe, you must understand the two core components that make it sing: the pickle preparation and the Parmesan choice. For the pickles, use high-quality dill spears or chips. Crucially, we need the brine. Do not throw away that jar juice after pulling out the pickles! The brine is essential for the initial marinade, injecting moisture and a foundational tang deep into the chicken fibers. If you only have sweet pickles, stop immediately and head back to the store; sweet pickles will ruin the savory profile we are aiming for.
When selecting your Parmesan, avoid the pre-grated dust in a shaker can, if possible. While convenient, it often lacks the necessary oils and depth of flavor. Opt for freshly grated or finely shredded Parmesan Reggiano or a high-quality domestic alternative. The fats in the proper Parmesan are what help bind the breading and melt slightly upon baking, creating those beautiful, almost caramelized spots of cheese on the crust. Incorporating dried dill directly into the breading enhances the overall pickle experience without making the chicken soggy, ensuring the dill aroma hits you immediately.
Ingredients for The Best Crispy Dill Pickle Parmesan Chicken
Here’s what you’ll need to make this delicious dish:
- Boneless, Skinless Chicken BreastsChoose four evenly sized breasts, about 6 ounces each, or use chicken tenderloins for faster cooking.
- Dill Pickle BrineSave the liquid from a jar of good quality dill pickles; this acts as the essential tenderizing marinade.
- All-Purpose FlourUsed as the first layer in the breading process to help the liquid binder adhere securely to the chicken.
- Large EggsWhisk these lightly to create the crucial middle layer that ensures the dry ingredients stick firmly for maximum crunch.
- Panko BreadcrumbsThese Japanese-style breadcrumbs are significantly lighter and flakier than traditional crumbs, providing superior crispness.
- Grated Parmesan CheeseFreshly grated or finely shredded is highly recommended for better flavor and binding capability in the crust.
- Dried Dill WeedMix this directly into the breading mixture to amplify the pickle flavor profile without adding excess moisture.
- Garlic Powder and Onion PowderThese common pantry spices enhance the savory depth of the crust, complementing the cheese and dill notes.
- Black Pepper and SaltSeasoning is vital; use fine sea salt and freshly cracked black pepper to taste, adjusting after the brining process.
- Neutral Cooking Oil Spray or Vegetable OilUsed for baking or pan-frying to ensure the chicken develops a beautiful golden-brown color and a satisfying crunch.
The full ingredients list, including measurements, is provided in the recipe card directly below.
How to Make The Best Crispy Dill Pickle Parmesan Chicken
Follow these simple steps to prepare this delicious dish:
Step 1: Brine and Prep the Chicken
Place the chicken breasts into a large, non-reactive dish or a zip-top bag. Pour the dill pickle brine over the chicken, ensuring the meat is fully submerged or coated. Marinate in the refrigerator for at least two hours, but preferably four to six hours, to maximize tenderness and flavor infusion. When ready to cook, remove the chicken, pat it thoroughly dry using paper towels, and discard the marinade.
Step 2: Set Up the Breading Station
Preheat your oven to 400°F (200°C) or prepare your air fryer. Set up a three-stage breading station. In the first shallow dish, place the all-purpose flour. In the second dish, lightly whisk the large eggs. In the third dish, combine the Panko breadcrumbs, grated Parmesan cheese, dried dill weed, garlic powder, onion powder, and a pinch of black pepper. Mix the Panko mixture thoroughly until the cheese and spices are evenly distributed.
Step 3: Triple-Dredge for Maximum Crunch
Take one dried chicken breast and first dredge it completely in the flour, shaking off any excess. Next, transfer the floured chicken to the egg wash, ensuring all surfaces are moistened. Finally, press the egg-coated chicken firmly into the Panko-Parmesan mixture, ensuring the crust adheres tightly to every inch. Repeat this process for all four chicken pieces.
Step 4: Bake Until Golden and Crispy
Lightly spray a baking sheet or an air fryer basket with cooking oil spray. Place the breaded chicken pieces onto the prepared surface, ensuring they do not touch. Lightly spray the tops of the chicken cutlets with additional oil spray; this step is critical for achieving a beautiful golden-brown and crispy finish. Bake for 20 to 25 minutes, or air fry for 15 to 18 minutes, until the internal temperature reaches 165°F (74°C).
Step 5: Rest and Serve
Once cooked through and gloriously golden, remove the chicken from the oven or air fryer. Let the cutlets rest on a wire rack for five minutes. This resting period allows the juices to redistribute and helps the crust maintain its crispness. Transfer to plates and serve immediately with a drizzle of ranch dressing or a simple lemon-mayonnaise dipping sauce for the perfect finishing touch.
Tips and Tricks for Maximum Crunch
The quest for the ultimate crispy crust can be tricky, but a few professional secrets will ensure your Dill Pickle Parmesan Chicken achieves maximum textural perfection. First, the temperature of the chicken matters. Starting with cold chicken helps the breading adhere better and prevents the coating from becoming gummy before it cooks. Always ensure your chicken is refrigerated right up until the moment it enters the flour station.
Secondly, humidity is the enemy of crunch. If your kitchen is particularly humid, you might want to consider chilling the fully breaded chicken in the freezer for about 15 minutes before baking. This quick freeze helps to “set” the coating, dramatically reducing the chances of slippage during cooking. Also, remember to spray the chicken generously with oil before baking. If you skip this step, the Panko will remain pale and crunchy, but it won’t achieve that deep, satisfying golden hue we are looking for. If you prefer pan-frying, use a high-smoke point oil like canola or vegetable oil, ensuring the oil is hot but not smoking before you add the chicken, and flip it only once for an even crust.
Finally, avoid overcrowding the pan or air fryer basket. Giving each chicken cutlet ample breathing room allows the hot air to circulate completely around the surface, which is essential for uniform crisping. If you are cooking a large batch, it is always better to cook in two rounds than to cram everything onto one sheet pan and end up with sad, steamed bottoms.
What to Serve with Your Crispy Chicken Masterpiece
This intensely flavored chicken needs side dishes that are either creamy and cool to soothe the palate, or simple and fresh to cut through the richness. Avoid heavy starches that compete with the texture of the chicken. A classic combination is simple mashed potatoes (made with chicken broth instead of milk for extra savoriness) and a vibrant green vegetable.
A simple side salad tossed with a tangy cider vinaigrette is a fantastic pairing, offering acidity and brightness. You could also serve this chicken alongside oven-roasted asparagus or green beans tossed lightly with garlic and lemon zest. For a heartier meal, consider serving the chicken over a bed of fluffy white rice or alongside a simple macaroni and cheese. If you enjoy dips, a homemade ranch dressing or a dill-infused creamy yogurt dip elevates the dish to appetizer status, especially if you cut the chicken into crispy strips before serving.
FAQs About Dill Pickle Parmesan Chicken
How long can I marinate the chicken in pickle brine?
You can safely marinate the chicken for up to 8 hours. If you go much longer than 10 hours, the acidity might start to break down the chicken too much, leading to a slightly mushy texture, so stick to the 4 to 6-hour sweet spot for ideal results.
Can I freeze the breaded chicken before cooking?
Yes, you absolutely can freeze it! Bread the chicken fully, then place the pieces on a parchment-lined baking sheet and freeze until solid. Once frozen, transfer the pieces to a freezer bag or airtight container. Bake from frozen, adding about 10-15 minutes to the total cooking time.
What is a good substitute for Panko breadcrumbs?
While Panko offers the absolute best crunch, you can substitute it with coarsely crushed plain corn flakes or simple crushed crackers mixed with a little regular dried breadcrumbs for texture. Ensure whatever substitute you use is completely dry before mixing with the cheese and spices.
How do I keep the coating from falling off?
The key to preventing coating loss is using the standard flour-egg-crumb procedure and ensuring the chicken is patted very dry after brining. Also, press the final Panko layer firmly onto the chicken and do not overcrowd the baking sheet, as steaming can cause the coating to detach.
There you have it—a recipe that defies expectations and transforms a simple weeknight ingredient into a memorable, flavor-packed meal. Go forth, embrace the tang, and enjoy every single crunchy bite ofThe Best Crispy Dill Pickle Parmesan Chicken. It is the kind of recipe that earns you spontaneous applause from the dining room table.
The Craziest Culinary Crossover You Didn’t Know You Needed
Welcome, adventurous eaters, to the recipe that simultaneously startled and delighted my entire neighborhood. We’re talking about a chicken dish so outrageously flavorful and aggressively crunchy that it redefines the concept of comfort food. If you are the type of person who finishes a jar of pickles just to drink the leftover brine, this is your culinary moment. We are makingThe Best Crispy Dill Pickle Parmesan Chicken—a brilliant mashup that delivers tang, salt, and intense savory notes in every unforgettable bite.
I understand if you’re raising an eyebrow. Pickles and parmesan? Yes. Trust the process. The acidity of the dill pickle brine tenderizes the chicken beautifully, while the finely chopped pickles and dried dill integrate directly into the parmesan-panko crust, transforming what would be a standard chicken cutlet into a crunchy, golden masterpiece. Prepare yourself for compliments, requests for the recipe, and the sudden realization that all other fried chicken is now boring.
Gathering Your Arsenal for Ultimate Crispiness
Essential Ingredients Checklist
Before donning your culinary armor, ensure your pantry is stocked. The secret to this recipe lies heavily in the quality of the dill pickles—choose ones that are firm and deeply flavored. We will use both the pickles themselves and a bit of their glorious brine to tenderize the chicken and boost the flavor profile of the coating.
- Chicken:Four boneless, skinless chicken breasts or eight chicken cutlets, butterflied thinly.
- The Brine Layer:1/2 cup finely chopped dill pickles (ensure excess liquid is patted out), 1/4 cup dill pickle juice (brine), 2 tablespoons smooth Dijon mustard.
- The Flour Power:1 cup all-purpose flour, seasoned with 1 teaspoon black pepper and 1 teaspoon paprika.
- The Egg Binder:Two large eggs, lightly beaten with a splash of water.
- The Crunchy Crust:1 cup Panko breadcrumbs, 1/2 cup finely crushed plain crackers (like Ritz or Saltines), 1/2 cup grated Parmesan cheese, 2 tablespoons dried dill weed, 1 teaspoon garlic powder.
- Frying Medium:Vegetable oil or canola oil for shallow frying.
The Art of Prepping the Pickle Coating
Preparation is where we separate the casual cooks from the culinary heroes. First, butterfly your chicken breasts if they are thick to ensure even cooking and maximum surface area for that incredible crust. If you skip this step, you risk an undercooked center or an over-browned exterior. Next, create the magic marinade using the pickle brine and Dijon. Whisk them together in a shallow dish. This step adds a crucial layer of moisture and tangy flavor beneath the crispy exterior, preventing the chicken from tasting dry or dull.
In a separate, wide dish, mix the Panko, crushed crackers, parmesan, dried dill, and garlic powder thoroughly. This dry mix is the heart and soul of the crunch. Ensure the parmesan is finely grated; if the shreds are too thick, they won’t adhere properly, leading to a melting cheese disaster instead of crusty perfection. This coating is robust, providing both structural integrity and overwhelming flavor payoff.
Sizzling Success: Making Crispy Dill Pickle Parmesan Chicken
Step 1: The Flavor Soak and Dredging Assembly Line
Take your chicken cutlets and place them into the brine and Dijon mixture. Allow them to marinate for about 15 to 20 minutes—no longer, or the brine may start to change the texture of the meat too drastically. While they soak up the flavor, set up your standard breading station: Flour, Eggs, and then the Pickle-Parmesan Crust. Lightly dredge each cutlet in the seasoned flour first, ensuring a thin, even coat. Shake off any excess flour aggressively.
Next, dip the floured cutlet into the beaten egg, allowing any excess egg to drip away slightly. Finally, press the chicken firmly into the dill-parmesan mixture. The key here is pressure—you must embed that crust deeply into the chicken, giving you maximum surface area coverage and guaranteed durability during frying. Once coated, place the cutlets on a wire rack for 10 minutes; this allows the coating to set.
Step 2: The Shallow Fry Shortcut for Golden Glory
Heat about half an inch of oil in a large, heavy-bottomed skillet over medium-high heat. The ideal oil temperature is around 350°F (175°C). The oil is ready when a small piece of panko sizzles immediately upon contact without turning dark brown instantly. Carefully place the breaded chicken into the hot oil, ensuring you do not overcrowd the pan. Overcrowding drops the oil temperature quickly, leading to a greasy, sad chicken rather than a glorious, crunchy one.
Fry the chicken for about 3 to 4 minutes per side, or until the exterior is deeply golden brown and audibly crispy. We are aiming for an internal temperature of 165°F (74°C). If your chicken pieces are particularly thick, finish them in a preheated oven at 375°F (190°C) for five minutes after the initial sear to ensure they cook completely without burning the crust. Transfer the finished pieces immediately to a fresh wire rack lined with paper towels to drain excess oil. Do not place them directly on paper towels; the steam will congregate and instantly destroy the crunch you worked so meticulously to achieve!
Flavor Boosts and Pairing Pointers
This dish demands attention and thoughtful accompaniment. ServeThe Best Crispy Dill Pickle Parmesan Chickenimmediately. It pairs beautifully with a creamy mashed potato or a light, lemon-dressed arugula salad to cut through the richness. If you are feeling extra adventurous, serve it alongside a homemade ranch dip blended with even more finely chopped dill pickles for an unparalleled tangy dipping experience. The contrast between the hot, savory chicken and the cool, creamy dip is pure culinary bliss.
For those looking to enhance the dill flavor further, consider mixing fresh chopped parsley and chives into the dry coating just before frying; the fresh herbs will add complexity and a vibrant color contrast. If you prefer a lighter profile, try finishing the chicken with a quick spritz of fresh lemon juice immediately after it comes out of the oil. This bright acidity complements the dill and parmesan perfectly.
The Secret to Super Sticky Crusts
If you find the crust falling off during the frying process, it usually means two things: either you didn’t press the dry coating firmly enough, or the chicken was too wet after the egg dip. As mentioned, letting the breaded chicken rest on a wire rack for 10-15 minutes before frying is a true game-changer. This rest period allows the wet components (egg) to bond chemically with the dry components (panko/parmesan), creating a superior, stickier seal that resists separation and guarantees a truly crispy result during cooking.
Perfecting the Cooking Process

Start by preparing the dredging station before touching the chicken; efficiency is key. Fry the chicken in batches to maintain high oil temperature, then use the residual heat to warm up your side dish while the cooked chicken rests for maximum juice retention.
Add Your Touch
Substitute finely crushed pretzels for crackers for an earthier, saltier profile, or swap chicken for turkey cutlets. For a spicy kick, add a teaspoon of cayenne pepper to the dry Panko mix, or serve with a smoky chipotle ranch dressing.
Storing & Reheating
Store leftovers in an airtight container in the refrigerator for up to three days. To revive the glorious crispiness, reheat the chicken in an oven or air fryer at 350°F (175°C) for 8-10 minutes. Avoid the microwave at all costs!
I remember the first time I served this to my notoriously picky cousin; he tried to claim I bought it from a fancy restaurant. It instantly became the requested centerpiece for every family gathering.
Chef’s Insider Tips
-
Ensure your oil is shimmering hot before adding the chicken, but not smoking, to achieve that deep golden color and fast, even cook without burning the dill.
-
Pat the chicken cutlets completely dry before starting the flour dredge; moisture is the enemy of a successful, adherent, and incredibly crispy coating.
-
Use freshly grated Parmesan if possible, as pre-grated varieties contain anti-caking agents that can hinder the formation of a rock-solid, savory crust.
Conclusion for The Best Crispy Dill Pickle Parmesan Chicken
So there you have it—the definitive guide to mastering The Best Crispy Dill Pickle Parmesan Chicken. We’ve covered everything from the crucial overnight pickle juice brine, which guarantees maximum juiciness, to the Panko-and-Parmesan coating that delivers that irresistible, shatteringly crispy crust. This isn’t just chicken; it’s a flavor adventure, marrying the tangy nostalgia of a deli pickle with the savory comfort of Italian-inspired breading. Stop daydreaming about this magnificent dish and start cooking. Trust us, your dinner routine is about to get a whole lot more exciting and dramatically crispier!
Print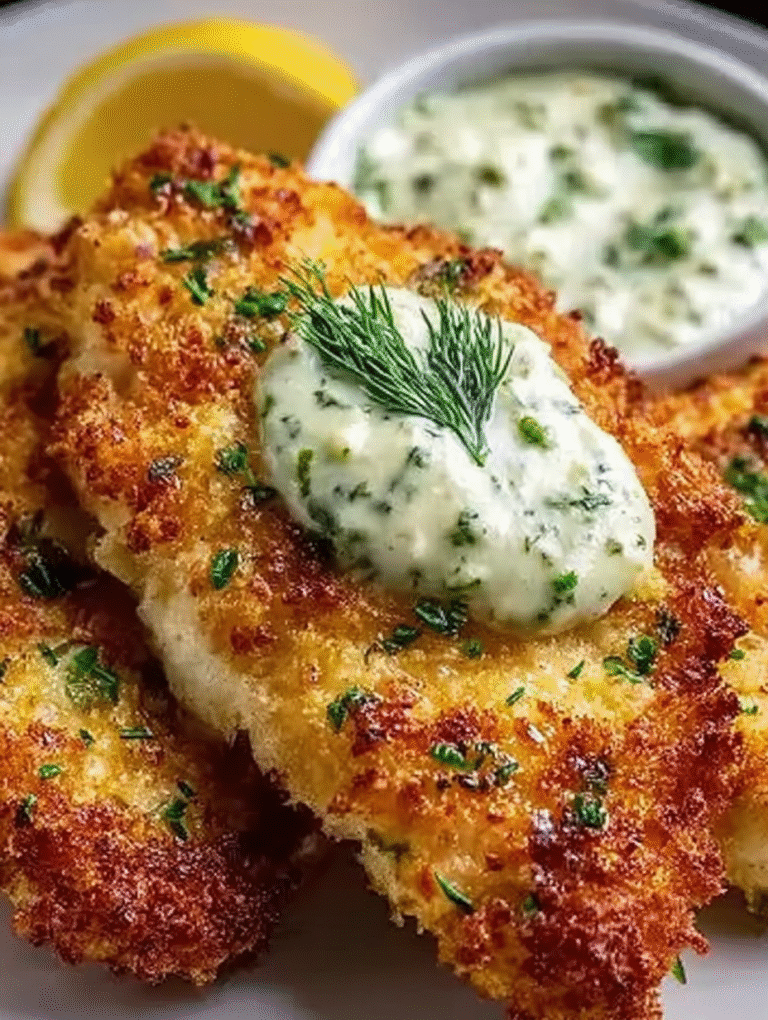
The Best Crispy Dill Pickle Parmesan Chicken
The ultimate crunch! Brined in tangy pickle juice, these golden chicken cutlets are coated in a Panko-Parmesan crust. Get the full step-by-step instructions and nutritional breakdown right here.
- Total Time: 35 minutes
- Yield: 4 servings 1x
Ingredients
- 4 boneless, skinless chicken breasts (halved lengthwise to create 8 cutlets)
- 1/2 cup dill pickle brine (juice)
- 1 cup Panko breadcrumbs
- 1/2 cup finely grated Parmesan cheese
- 2 large eggs (lightly beaten)
- 2 tablespoons dried dill weed
- 1 teaspoon garlic powder
- 1/4 cup vegetable oil (or canola oil, for frying)
Instructions
- Step 1: Prepare the chicken and brine. Place the chicken cutlets in a shallow dish and pour the dill pickle brine over them. Let the chicken marinate for at least 30 minutes (or up to 2 hours in the refrigerator), ensuring all sides are coated.
- Step 2: Set up the dredging station. In a shallow bowl, whisk the eggs. In a separate wide bowl, combine the Panko breadcrumbs, grated Parmesan cheese, dried dill weed, and garlic powder. Mix the dry ingredients thoroughly until the Parmesan is evenly distributed.
- Step 3: Coat the chicken. Remove one piece of chicken from the brine, shaking off any excess liquid. Dip the chicken fully into the beaten egg mixture, then immediately transfer it to the Panko mixture. Press the Panko firmly onto the chicken cutlet to ensure a thick, even, and crispy coating on both sides. Repeat with all remaining cutlets.
- Step 4: Cook the chicken. Heat the vegetable oil in a large skillet over medium-high heat. Once the oil is shimmering, carefully place the coated chicken cutlets in the pan (working in batches if necessary, avoid overcrowding). Fry for 4–5 minutes per side until the coating is deep golden brown and crispy, and the internal temperature reaches 165°F (74°C).
- Step 5: Finish and serve. Remove the cooked chicken from the skillet and place it on a wire rack or a paper towel-lined plate to drain excess oil. Allow the chicken to rest for 5 minutes before serving for maximum crispness.
Notes
- For best storage, ensure the chicken is fully cooled before refrigerating, then place it in a single layer on a paper towel-lined container to absorb moisture and preserve the crispy texture for up to four days.
- To revive the crunch, skip the microwave; reheat the cutlets in an air fryer at 350°F (175°C) for 5–7 minutes, or bake them on a wire rack in the oven until heated through.
- Serve these savory, tangy cutlets atop a bed of peppery arugula dressed with lemon and olive oil, or pair them with a side of creamy dill dipping sauce to balance the Parmesan richness.
- For the crispiest coating, let the chicken drain only briefly after marinating; the slight stickiness from the pickle brine helps the egg and Panko mixture adhere tightly when you press it on firmly.
- Prep Time: 15 minutes
- Cook Time: 20 minutes
- Method: Stovetop
- Cuisine: American
FAQs
Why is brining the chicken crucial for flavor in this recipe?
The secret to achieving the robust, tangy flavor of The Best Crispy Dill Pickle Parmesan Chicken lies in the brine. Soaking the chicken breasts in dill pickle juice not only tenderizes the meat but also infuses it deeply with that characteristic sour and salty punch. Aim for at least four hours of marination, or preferably overnight, to allow the acidity to work its magic. This ensures that every bite is juicy and flavorful, contrasting beautifully with the crunchy, savory Parmesan crust. Don’t skip this step if you want maximum dill impact!
How do I guarantee maximum crunchiness for the pickle parmesan chicken breading?
Achieving outstanding crispiness for this pickle parmesan chicken requires a few essential techniques. First, always pat the marinated chicken completely dry before breading; excess moisture steams the coating rather than frying it. Second, use Panko breadcrumbs mixed with the Parmesan, as they provide a superior airy texture compared to standard breadcrumbs. Finally, ensure your cooking oil is heated to the correct temperature—around 375°F (190°C)—and avoid overcrowding the pan. A hot, slightly aggressive fry is key to that beautiful golden-brown, shattering crust.
What are the ideal side dishes to pair with this savory, tangy chicken?
This savory and tangy chicken demands sides that offer a refreshing contrast to its richness and acidity. Because the pickle flavor is so prominent, consider serving it alongside a cool, creamy potato salad or a simple, crisp green salad tossed in a bright lemon vinaigrette. For something warmer, roasted root vegetables like carrots or parsnips provide an earthy sweetness that cuts through the rich Parmesan and acidity of the chicken. Avoid heavy starches that might compete with the richness of the breading, focusing instead on freshness and textural variety.
Can I prepare The Best Crispy Dill Pickle Parmesan Chicken ahead of time and keep it crispy?
While the chicken is absolutely divine when eaten fresh, you can certainly reheat The Best Crispy Dill Pickle Parmesan Chicken while maintaining most of its crunch. Never use the microwave, as that is the fast track to a soggy disaster. Instead, preheat your oven or toaster oven to 375°F (190°C) and place the chicken directly on a wire rack set over a baking sheet. This elevates the chicken, allowing air to circulate fully around the breading. Reheat for about 10 to 15 minutes, or until warmed through, and the crispy texture will mostly return.

Leave a Comment