

The annual holiday cookie marathon is officially canceled. We’re trading tedious rolling and precise cutting for pure, unadulterated speed, delivering the ultimate festive treat.
Forget the flour dust cloud; these decadent, chewy squares are trulyThe best winter holiday sugar cookie barsyou will ever meet.
- No chilling or rolling required, making holiday baking streamlined, stress-free, and significantly quicker than traditional cutouts.
- Rich, buttery sugar cookie flavor is enhanced by a delicate hint of vanilla and a creamy, beautifully festive frosting layer.
- These are vibrant and customizable bars that look professionally festive without demanding hours of intricate decorating skill.
- Easily adaptable for any celebration, allowing quick switches in frosting colors or sprinkles to match the specific occasion seamlessly.
The Great Cookie Compromise: Why Bars Always Win
Let’s be honest, the holidays are inherently stressful. Between trying to find that one roll of tape hiding in the junk drawer and attempting to assemble a terrifyingly complex children’s toy, who truly has time to battle a batch of traditional cutout sugar cookies?
I remember one year, fueled entirely by caffeine and seasonal stubbornness, I spent six solid hours rolling, cutting, baking, cooling, and icing three dozen identical gingerbread men. My kitchen looked like a flour mill explosion, my back ached, and when I finally finished, the only person left awake to appreciate them was my extremely judgmental cat.
That was the day I officially decided to embrace efficiency. Why spend half a day creating perfect circles when you can dump the dough into a pan, bake it for 25 minutes, and achieve the exact same euphoria? This recipe for the perfect holiday sugar cookie bars is a testament to working smarter, not harder. You achieve that signature soft, chewy, melt-in-your-mouth sugar cookie texture, but with 90% less stress and 100% more time left over for watching those cheesy holiday movies.
The beauty of the bar format is twofold: speed and consistency. The dough bakes evenly, ensuring every single square—from the corner piece with the delightful crusty edges to the gooey center piece—is sheer perfection. We skip the lengthy refrigeration step required for cutout stability and jump straight into mixing the batter. Plus, decorating becomes a breeze. Instead of meticulously piping details onto 30 individual cookies, you simply slather on the frosting and shower the entire sheet with festive sprinkles. It is instant holiday cheer, delivered in a fraction of the time, proving that sometimes, being lazy is actually the most brilliant route to festive success.
Essential Tips for Perfect Sugar Cookie Bar Success
While this recipe simplifies the process dramatically, a few core baking principles ensure your finished bars achieve that ideal balance of chewiness and softness. Baking is a science, but don’t worry, we are dealing with friendly, approachable science, not the kind that requires safety goggles and advanced algebra. Getting the temperature and texture right before the bars even hit the oven is the secret weapon in your holiday baking arsenal.
Mastering the Butter and Sugar Mixture
The foundation of any great sugar cookie is the creaming process. Start with truly softened butter—not melted, but soft enough that pressing it leaves an indent. Cold butter will result in dense, grainy bars, while melted butter will make the dough greasy. You need to cream the butter and sugar together until the mixture is light, fluffy, and noticeably paler in color. This process takes about three to five minutes with an electric mixer, and it incorporates tiny air pockets that give the bars their wonderful lift and airy texture. Do not skip this step or cut it short, as it dictates the final outcome more than any other.
Flour Measurement Matters
Accurate flour measurement is non-negotiable in baking. Too much flour results in dry, crumbly bars that taste like sandpaper; too little leads to dense, flat hockey pucks. If possible, use a kitchen scale for precise results. If you rely on measuring cups, use the “spoon and level” method: gently spoon the flour into the measuring cup until overflowing, then level the top with the straight edge of a knife. Never scoop the flour directly out of the bag, as this compacts it and adds up to 25% extra flour, ruining your perfectly soft dough.
The Perfect Baking Temperature
We bake these sugar cookie bars at 350°F (175°C). This moderate temperature ensures the bars cook through evenly without burning the edges before the center is set. The total baking time will depend heavily on your oven and the thickness of your pan. You are looking for a beautiful, golden-brown edge, but the center should still look soft and slightly pale. The center should look set and slightly puffed. Remember, the bars will continue to set as they cool. Overbaking them by even two minutes will drastically reduce their chewiness, so err on the side of slightly underdone rather than overdone.
Ingredients for The best winter holiday sugar cookie bars
Here’s what you’ll need to make this delicious dish:
- Unsalted ButterEnsure it is properly softened to room temperature for the creaming process, which incorporates air and creates a tender crumb.
- Granulated SugarProvides the primary sweetness and aids in the structure development when creamed with the butter.
- EggsAct as the binding agent for the dough, adding richness and necessary moisture to prevent dryness.
- Vanilla PowderUse high-quality pure vanilla powder to enhance the overall flavor profile of the classic sugar cookie.
- All-Purpose FlourThe main structure of the bar; make sure to measure it correctly using the spoon and level method.
- Baking Powder and SaltBaking powder gives the bars lift and lightness, while salt balances the sweetness, enhancing the overall flavor.
- Powdered Sugar (Confectioners’ Sugar)The base for our creamy, smooth holiday frosting, essential for dissolving quickly into the butter.
- Milk or Heavy CreamUsed sparingly in the frosting to achieve the perfect spreading consistency and richness.
- Festive Sprinkles or DecorationsNecessary additions for visual appeal and the required level of holiday sparkle and cheer.
The full ingredients list, including measurements, is provided in the recipe card directly below.
How to Make The best winter holiday sugar cookie bars
Follow these simple steps to prepare this delicious dish:
Step 1: Prep the Pan and Preheat
Preheat your oven to 350°F (175°C). Use a 9×13 inch baking pan (metal pans work best for even heat). Line the pan completely with parchment paper, leaving an overhang on the sides. This overhang acts as a handle later, allowing you to easily lift the entire slab of bars out for cooling and cutting. Lightly spray the parchment paper with nonstick cooking spray to prevent sticking.
Step 2: Cream the Wet Ingredients
In the bowl of a stand mixer fitted with the paddle attachment, or using a large bowl and a hand mixer, cream together the softened butter and granulated sugar until the mixture becomes pale and fluffy, usually about 3 to 5 minutes. Add the eggs one at a time, mixing well after each addition. Pour in the vanilla powder and mix until just combined. Scrape down the sides of the bowl to ensure all ingredients are fully incorporated.
Step 3: Combine Dry Ingredients and Form Dough
In a separate medium bowl, whisk together the all-purpose flour, baking powder, and salt. Gradually add the dry ingredients to the wet mixture, mixing on low speed until a soft dough forms. Be careful not to overmix; stop as soon as all the flour streaks disappear. The dough will be thick, soft, and slightly sticky.
Step 4: Press and Bake the Bars
Transfer the dough immediately to the prepared 9×13 inch pan. Use your hands or an offset spatula lightly dusted with flour to press the dough evenly into the bottom of the pan, making sure it reaches all the corners. Bake for 22 to 27 minutes. The bars are ready when the edges are light golden brown and the center appears set, but still soft. Remove the pan from the oven and let the bars cool completely in the pan on a wire rack—cooling is mandatory before frosting.
Step 5: Whip Up the Festive Frosting
While the cookie base cools, prepare the frosting. In a clean mixing bowl, beat the softened butter until smooth and creamy. Gradually add the powdered sugar, mixing on low speed until incorporated, then increase the speed to medium and beat until light and fluffy. Slowly drizzle in the vanilla powder and milk or cream, a tablespoon at a time, until the frosting reaches a smooth, spreadable consistency. If the frosting seems too thick, add a tiny bit more liquid; if too thin, add a tablespoon of powdered sugar.
Step 6: Frost, Decorate, and Slice
Once the cookie base is completely cool (this may take up to two hours), use the parchment paper overhang to lift the entire cookie slab out onto a cutting board. Spread the prepared frosting evenly across the top using an offset spatula. Decorate immediately with your favorite holiday sprinkles, sanding sugar, or crushed candy cane pieces. Allow the frosting to set slightly before slicing into 24 even bars using a sharp knife for the cleanest cuts.
Transfer to a decorative platter and enjoy the swift satisfaction of holiday baking done right.
The Accidental Discovery of Sunshine on a Plate

I was aiming for traditional cutout cookies but ran out of patience and flour dusters. Dumping the entire batch into a 9×13 pan, I figured the worst that could happen was a giant, messy cookie brick. Instead, I accidentally createdthe best winter holiday sugar cookie bars—pure, effortless joy, perfect for the season.
The Drama of the Drop Cookie (and Why We Switched to Bars)
Let’s be honest, December is chaos. Between wrapping presents that definitely don’t fit into the box they came in and trying to remember where you hid the backup roll of tape, who has time for fussy baking? I adore sugar cookies, truly. They are the quintessential taste of Festive Season magic. However, the process of rolling, cutting, relocating the fragile shapes, and then praying they don’t lose their snowflake identity in the oven often feels like a culinary marathon I’m not trained for.
That is precisely how I pivoted tothe best winter holiday sugar cookie bars. They require zero rolling pins, zero cookie cutters, and crucially, zero therapy sessions dedicated to crumbled dough. These bars deliver all the buttery, vanilla-laced nostalgia of a classic sugar cookie, but packaged in a delightfully easy square format. Think of them as the low-maintenance cousin of the diva cutout cookie.
The Anatomy of the Perfect Base
Achieving the right texture for the bar base is non-negotiable. We are aiming for chewy edges and a slightly soft, dense center—not cakey, and definitely not crumbly. This involves proper creaming. You must beat the room-temperature butter and sugar until the mixture is visibly light and fluffy. This step is where the magic happens, incorporating air that prevents the bars from becoming hard tack. If your mixture still looks grainy, you haven’t creamed long enough. Patience, dear baker! This process usually takes three to five full minutes with a stand mixer.
After incorporating the egg and vanilla, the dry ingredients (flour, baking powder, and salt) must be added gently. Overmixing flour develops gluten, which makes the bars tough. Stop mixing the second you see the last streak of flour disappear. Trust your instincts, but more importantly, trust the process. Pressing the dough into the pan should be firm but even. I highly recommend lining your 9×13 pan with parchment paper, leaving an overhang on the sides. This ensures you can lift the entire baked slab out of the pan, making frosting and cutting a breeze later on. This single trick saves countless minutes of frantic scraping.
Essential Ingredients for Seasonal Cookie Squares
While the ingredient list for these festive baked treats looks basic, quality matters, especially when dealing with such simple flavors. You cannot hide subpar ingredients here. If your vanilla powder tastes like sadness, your cookies will too. Splurge on the good stuff; your holiday spirit deserves it. We utilize standard pantry staples, ensuring that even a spontaneous weeknight baking session is achievable without a last-minute grocery run.
Gathering Your Supplies
For the cookie base, you will need:
- Unsalted butter, softened to true room temperature.
- Granulated white sugar and a touch of light brown sugar for depth.
- Large eggs, also at room temperature.
- Pure vanilla powder (use the good stuff!).
- All-purpose flour, carefully measured.
- Baking powder and a pinch of salt.
For the cloud-like frosting, prepare:
- Softened unsalted butter.
- Plenty of sifted powdered sugar.
- Milk or heavy cream (I prefer whole milk).
- More vanilla powder.
- Holiday-themed sprinkles (essential for maximum festivity).
Remember that precise measurement is key, particularly with flour. Too much flour results in dry, heavy bars, defeating the purpose of these wonderfully soft seasonal cookie squares. Use the spoon-and-level method: spoon the flour into your measuring cup, then level off the excess with a straight edge.
Perfecting the Cooking Process
For these bars, efficiency is key. First, ensure your butter and eggs are truly room temperature for a uniform dough. Press the dough into the pan, chill briefly to prevent spreading, and then bake until the edges are just barely golden. The frosting step must wait until they are completely cool.
Baking Techniques That Guarantee Success
Baking time is crucial for these cookie squares. We want them cooked through, but still soft. If you bake them until they are uniformly dark brown, you’ve gone too far, and they will be crispy. The visual cue you are looking for is pale gold edges, with the center still looking slightly underdone or soft. Since we pressed the dough into a solid mass, the carryover heat from the pan will finish cooking the center as they cool on the counter.
Pull the bars out of the oven when the edges are set and the interior looks matte. Let them cool in the pan for about 15 minutes before carefully using the parchment overhang to lift the entire structure onto a cooling rack. They must cool completely—and I mean completely—before the frosting enters the picture. Attempting to frost a warm cookie bar is a recipe for a greasy, sugary disaster that will slide right off the sides. This cooling period is an excellent opportunity to clean up the inevitable flour bomb that occurred during preparation.
The Secret to a Cloud-Like Frosting
The frosting is where these cookie bars truly shine. We are aiming for a silky, rich vanilla buttercream that sets perfectly. The trick to getting that smooth, lump-free texture is sifting your powdered sugar. Yes, it’s a pain, and yes, it makes a tiny cloud of sugar dust in your kitchen, but it is necessary.
Start with soft, unsalted butter, beat it until creamy, and then gradually add the sifted sugar along with vanilla and a few splashes of milk or cream. I favor whole milk because it keeps the frosting light without adding excessive richness. If the frosting seems too thick, add more liquid one teaspoon at a time. If it’s too thin, add more sifted powdered sugar. Remember, this frosting needs to be spreadable, but thick enough to hold the copious amounts of holiday sprinkles we are about to apply. Don’t be shy with the sprinkles—they are non-negotiable for achieving peak winter festivity.
Add Your Touch
Swap vanilla powder for almond paste for a deeper flavor profile. If you want a creamier topping, fold in a teaspoon of melted cream cheese into the frosting. For a citrusy kick, add a half teaspoon of fresh orange zest into the initial cookie dough mixture—it brightens everything up marvelously.
Customizing Your Winter Holiday Treats
While the classic vanilla profile is delicious, these easy sugar squares are incredibly versatile. If you prefer a crunchier texture, try folding in finely chopped toasted pecans or walnuts right before pressing the dough into the pan. If you want to enhance the holiday spice profile without going full gingerbread, add a quarter teaspoon of freshly grated nutmeg and a small pinch of ground cardamom to the dry ingredients.
For a non-traditional twist on the frosting, replace half the vanilla powder with lemon extract and a splash of fresh lemon juice. The tartness cuts through the sweetness beautifully and offers a refreshing counterpoint to the buttery bar. If you’re feeling adventurous, use natural food colorings derived from beets or spinach to achieve vibrant, unexpected holiday hues in your buttercream. Decorating is the fun part; after spreading the frosting evenly, you have a brief window to apply the sprinkles before the frosting begins to set. Embrace the maximalist approach and let the festive chaos ensue.
Storing & Reheating
Store fully cooled and frosted bars in an airtight container at room temperature for up to four days. If you prefer to freeze them, cut the bars first, then layer them between parchment paper. Thaw overnight in the refrigerator; never microwave them, or the frosting will melt into a sad puddle.
- Always use room temperature ingredients for both the dough and the frosting. This guarantees the smoothest possible texture and prevents clumping.
- Do not overbake these sugar squares; pull them out when the edges are just set and barely golden for a soft, chewy texture.
- Sift the powdered sugar for the frosting without fail. This is the ultimate secret to achieving a silky, restaurant-quality buttercream finish.
Last Festive Season, I sent a batch of these cheerful squares to my neighbor who typically only eats dark chocolate. She called me weeping—with joy, thankfully—proclaiming them her new holiday obsession, proving even the most cynical dessert lover appreciates a sprinkle.
Conclusion for The best winter holiday sugar cookie bars
Ultimately, these seasonal cookie squares are the perfect antidote to complicated holiday baking stress. They deliver the iconic flavor of traditional sugar cookies but remove all the tiresome effort of rolling and cutting. By focusing on quality ingredients, mastering the creaming step, and ensuring the bars cool completely before frosting, you guarantee success.The best winter holiday sugar cookie barsare not just a recipe; they are a delightful, no-fuss tradition waiting to happen. Whether you need a quick gift for a party or just a comforting treat after a long day of wrapping, these buttery, festive squares will bring genuine sunshine to your cold winter table.
Print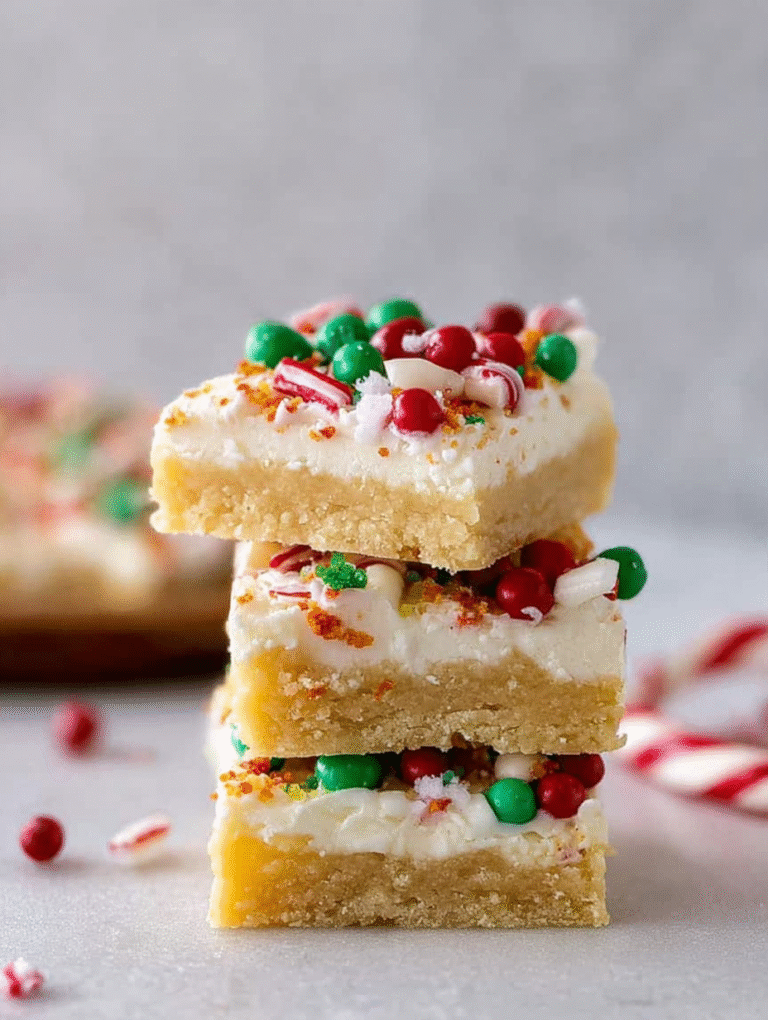
The best winter holiday sugar cookie bars
Sink your teeth into these ultra-soft Winter Sugar Cookie Bars. Featuring rich vanilla bean paste and a buttery crust, these bars bake up perfectly in a 9×13 pan.
- Total Time: 35 minutes
- Yield: 4 servings
Ingredients
- All-purpose flour (2 3/4 cups)
- Granulated sugar (1 1/2 cups)
- Unsalted butter (1 cup, softened, plus 1/2 cup for frosting)
- Large eggs (2)
- vanilla bean paste (3 teaspoons total, divided)
- Baking powder (1 teaspoon)
- Salt (1/2 teaspoon)
- Powdered sugar (3 cups, sifted)
Instructions
- Step 1: Preheat your oven to 350°F (175°C). Line a 9×13 inch baking pan with parchment paper, leaving an overhang on the long sides to easily lift the bars out later.
- Step 2: In a large bowl, cream together the 1 cup of softened butter and granulated sugar until light and fluffy. Beat in the eggs one at a time, followed by 2 teaspoons of vanilla powder. In a separate bowl, whisk together the flour, baking powder, and salt, then gradually add the dry mixture to the wet ingredients, mixing until just combined.
- Step 3: Press the prepared cookie dough evenly into the bottom of the lined pan. Bake for 25 to 30 minutes, or until the edges are lightly golden brown and a toothpick inserted into the center comes out clean. Remove from the oven and allow the bars to cool completely in the pan on a wire rack (about 1-2 hours).
- Step 4: While the bars cool, prepare the frosting: Beat the remaining 1/2 cup of softened butter until smooth. Gradually add the 3 cups of sifted powdered sugar, alternating with 2-4 tablespoons of milk or heavy cream until the frosting reaches a spreadable consistency. Stir in the remaining 1 teaspoon of vanilla powder.
- Step 5: Once the sugar cookie bars are completely cooled, lift them out of the pan using the parchment overhang. Evenly spread the buttercream frosting over the top, immediately sprinkle with holiday decorations (such as festive sprinkles or colored sugar), and cut into 24 squares before serving.
Notes
- Store leftover bars in an airtight container at room temperature for up to two days, or refrigerate for up to five days, ensuring the container is sealed well to prevent drying out.
- If the bars have been refrigerated, allow them to sit out for 20-30 minutes before serving; they are best enjoyed closer to room temperature for optimal chewiness and flavor.
- For the softest, chewiest cookie bar texture, make sure your 1 cup of butter is truly softened (but not melted!) when creaming it with the sugar; this incorporates more air for a tender crumb.
- For an extra cozy holiday presentation, serve these delightful bars alongside a mug of warm spiced apple cider or rich homemade hot chocolate.
- Prep Time: 15 minutes
- Cook Time: 20 minutes
- Method: Stovetop
- Cuisine: American

Leave a Comment