
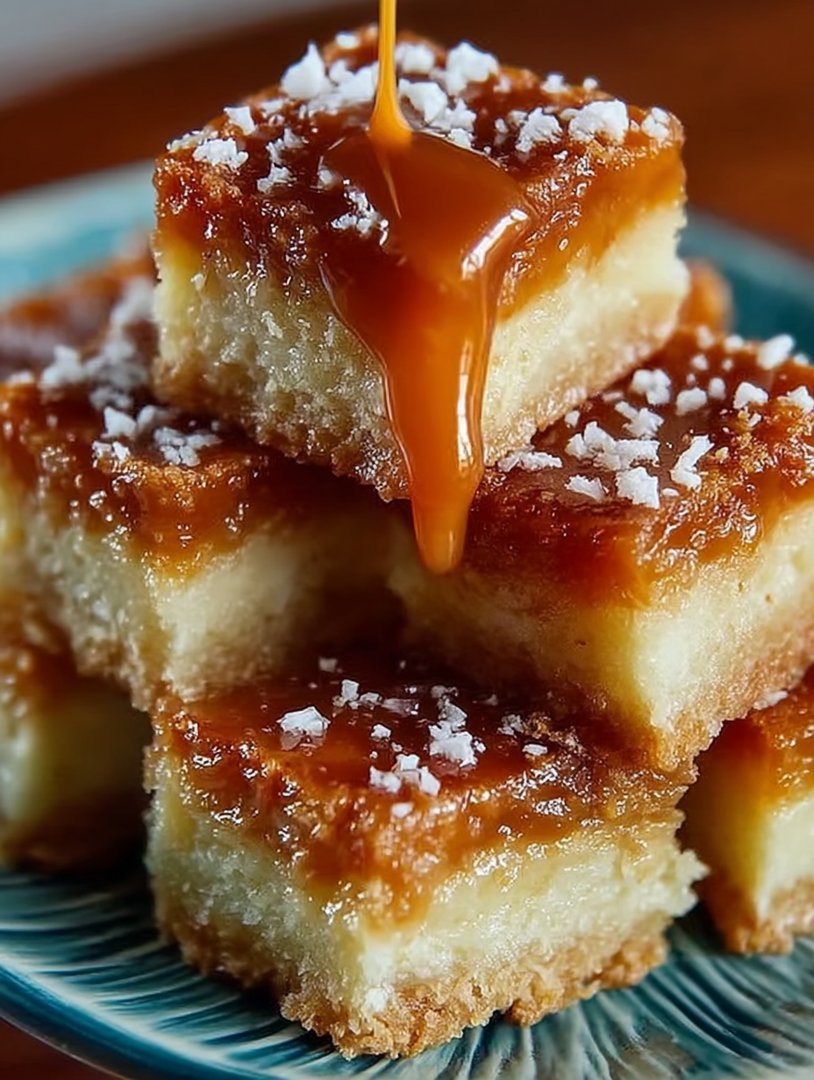
The smell of brown sugar and melted butter hitting a warm oven is practically a time machine, instantly transporting you back to Grandma’s kitchen. If you are hunting for that perfect, chewy, deeply satisfying square of comfort, you need this recipe. Forget fancy layer cakes; these easy-to-make treats deliver maximum flavor payoff with minimal fuss, which is why everyone eventually falls in love withTrisha Yearwood’s Butterscotch Bars.
- These incredible bars feature a rich, fudgy texture beneath a slightly crispy top, creating the ultimate contrast in every single bite.
- The simple preparation requires just one saucepan and a baking dish, making cleanup delightfully quick and incredibly painless.
- Boasting classic caramel and brown sugar notes, this recipe offers a nostalgic, complex flavor profile that appeals to all ages.
- They are wonderfully versatile for parties, potlucks, or simply satisfying that sudden, overwhelming Tuesday evening dessert craving.
Ingredients for Trisha Yearwood’s Butterscotch Bars
Here’s what you’ll need to make this delicious dish:
- All-Purpose FlourThe base structure for the bars, ensure it is measured correctly by scooping lightly and leveling off.
- Baking PowderProvides the necessary lift and aeration, resulting in a tender crumb structure that isn’t too dense.
- SaltEssential for balancing the sweetness and enhancing the deep, complex flavors of the butterscotch.
- Unsalted ButterCrucial for the rich flavor and texture; using unsalted butter allows you to control the total amount of sodium precisely.
- Light Brown SugarThe primary sweetener and flavor driver, contributing molasses notes essential for the classic butterscotch depth.
- EggsAct as a binder, helping to emulsify the batter and create the signature chewy texture of the finished bar.
- Vanilla PowderAdds warmth and complexity, deepening the background notes of the sugar and butter mixture wonderfully.
- Butterscotch ChipsThese melt into the mixture during baking, ensuring pockets of intense, caramelized flavor throughout every square.
The full ingredients list, including measurements, is provided in the recipe card directly below.
How to Make Trisha Yearwood’s Butterscotch Bars
Follow these simple steps to prepare this delicious dish:
Step 1: Prep and Dry Mixing
Preheat your oven to 350°F (175°C). Line a 9×13 inch baking pan with parchment paper, leaving an overhang on the sides for easy removal later. In a medium bowl, whisk together the flour, baking powder, and salt, ensuring everything is thoroughly combined before setting this aside.
Step 2: Melting the Butter and Sugar
In a large, heavy-bottomed saucepan, melt the unsalted butter over medium heat. Once melted, remove the pan from the heat immediately and stir in the light brown sugar until completely dissolved. Allowing the mixture to cool slightly here prevents scrambling the eggs in the next step.
Step 3: Wet Ingredients Incorporation
Add the eggs one at a time to the cooled butter-sugar mixture, stirring vigorously until fully incorporated and the mixture is smooth and glossy. Stir in the vanilla powder, ensuring the rich fragrance is fully distributed throughout the wet base.
Step 4: Combining and Folding
Gradually incorporate the dry flour mixture into the wet ingredients, mixing only until just combined. Overmixing will develop the gluten too much, resulting in tough bars instead of delightfully chewy ones. Finally, fold in the butterscotch chips gently with a spatula.
Step 5: Baking Perfection
Pour the batter evenly into the prepared baking pan, spreading it to the edges with your spatula. Bake for 25 to 30 minutes, or until the edges are golden brown and a toothpick inserted into the center comes out with moist crumbs clinging to it, indicating fudgy perfection.
Step 6: Cooling and Serving
Allow the bars to cool completely in the pan on a wire rack—this cooling time is crucial for developing the chewy texture. Once cool, use the parchment overhang to lift the entire sheet out, cut into squares, and transfer to plates for the perfect finishing touch.
The Secret History of the World’s Best Bar Cookie
There is something inherently joyful about a bar cookie. They lack the pretension of a delicate pastry and certainly skip the dramatic fuss of a tiered cake. Bar cookies are the reliable best friend of the dessert world—unfailingly delicious and always there when you need them most. And when we talk about reliability, we have to talk about butterscotch. Butterscotch, which is essentially caramelized brown sugar and butter, holds a special place in the pantheon of comforting American flavors. It’s not quite caramel, possessing a deeper, slightly more earthy molasses note thanks to the brown sugar content.
My own journey with these spectacular treats began during a disastrous attempt to make “elegant French macarons” for a school bake sale. After two hours of weeping over collapsed meringue shells, my mother—a woman whose patience levels rivaled a Buddhist monk facing a perpetually spinning plate—stepped in. She handed me a measuring cup and instructed me to make something easy, something guaranteed to work. That was the day I met these glorious brown sugar squares, and honestly, I never looked back. The simplicity is the genius, ensuring that even under pressure, you can achieve dessert nirvana without needing a culinary degree or specialized equipment.
The beauty of the recipe championed by culinary icon Trisha Yearwood is its robust, no-fail nature. It requires ingredients you likely already have lurking in your pantry, and the technique is straightforward enough for even the most novice baker. These aren’t light and airy; they are dense, chewy, and intensely flavorful. They manage to be crisp around the edges while remaining gloriously fudgy in the center, a texture that is notoriously difficult to achieve consistently. If you are looking to impress without stress, mastering this recipe is the first, and perhaps the only, baking skill you truly need.
Achieving Maximum Chewiness and Depth of Flavor
When you are dealing with a recipe this simple, the small details become giant levers for success. You want chewy bars, not cakey bricks, and the path to chewiness lies firmly in temperature control and ingredient selection. The selection of brown sugar is paramount here; always use light brown sugar, not dark. Dark brown sugar contains more molasses, which can make the bars slightly stickier and sometimes introduces a mild bitterness that competes with the delicate butterscotch flavor we are trying to achieve.
The Importance of Melted Butter
Using melted butter, as opposed to creaming softened butter, fundamentally changes the structure of the bar. Creaming introduces air, which leads to a cake-like rise. Melting the butter, cooling it slightly, and then mixing it with the brown sugar creates a dense, fudgy base. This mixture is less likely to rise significantly, guaranteeing that signature chewy density. Furthermore, the action of dissolving the sugar completely in the warm butter prevents a gritty texture, resulting in a smooth, professional-grade finish.
The Power of Proper Cooling
This is the step where most eager bakers get impatient and undermine their own results. When the bars come out of the oven, they are still structurally fragile and hot. Cutting them immediately results in mushy, misshapen pieces that lack the necessary chew. You must allow them to cool completely, preferably for two hours or more, before cutting. Cooling allows the fats and sugars to re-solidify, setting the structure and locking in that perfect, toothsome chew. Think of cooling as the grand finale of the baking process; without it, the show falls flat.
High Altitude Baking Adjustments
For bakers living above 3,500 feet, you might notice that bars and cookies tend to spread more or sometimes come out too dry. This is due to lower atmospheric pressure and the faster evaporation of liquids. To counteract this, slightly increase the flour (about 1–2 tablespoons per cup of flour) and slightly decrease the baking powder (a quarter teaspoon usually suffices). Additionally, consider raising the oven temperature by 25°F (about 14°C) and decreasing the baking time slightly. These minor tweaks ensure that even high in the mountains, you can still enjoy perfectTrisha Yearwood’s Butterscotch Bars.
Expert Swaps and Customizations for Your Bar Cookies
While the classic version ofTrisha Yearwood’s Butterscotch Barsis perfection itself, sometimes a baker needs to innovate. These bars serve as an excellent canvas for minor customizations, allowing you to tailor the flavors to whatever seasonal craving strikes you or whatever random ingredients you found hiding in the back of your cupboard. Since we are avoiding certain meats and alcohols, the focus remains on spices, nuts, and alternative sweet mix-ins that complement the deep brown sugar base.
Nutty Additions for Crunch
Introducing nuts provides a delightful textural contrast to the dense, soft bar. Walnuts and pecans are particularly excellent choices. Toasting the nuts lightly before folding them into the batter enhances their flavor dramatically. Simply spread the desired amount of nuts on a baking sheet and toast at 350°F (175°C) for about 5–7 minutes until fragrant. Let them cool, then fold them in with the butterscotch chips. This simple step elevates the complexity and offers a satisfying crunch with every bite.
Spice Cabinet Secrets
Butterscotch pairs brilliantly with warming spices. For a holiday feel, consider adding half a teaspoon of ground cinnamon and a quarter teaspoon of ground nutmeg into the dry mixture in Step 1. These spices don’t overpower the essential flavor of the brown sugar, but instead, they add a layer of cozy warmth that makes these bars absolutely irresistible on a cold evening. You can also experiment with a very small pinch of cayenne pepper if you enjoy a subtle, unexpected heat at the finish, but start conservatively!
Alternative Chip and Topping Ideas
If you are out of butterscotch chips, or just feel like a flavor adventure, substitute them with white chocolate chips, dark chocolate chunks, or even a mix of peanut butter chips and chocolate chips. Alternatively, once the bars have cooled slightly but are still warm, spread a quick glaze over the top using powdered sugar mixed with a splash of milk or a tiny bit of orange juice for brightness. The glaze dries to a satisfyingly thin, sugary crust, adding another layer of texture without much effort. Whether you keep them simple or dress them up, these butterscotch squares are guaranteed to disappear quickly from any platter.
Enjoying a bar of this quality is a reminder that the simplest things in life are often the best. These are not just cookies; they are edible moments of pure, unadulterated comfort that truly stand the test of time.
The Accidental Discovery of Sunshine on a Plate
I first stumbled upon Trisha Yearwood’s Butterscotch Bars while attempting a decidedly ambitious cake—which promptly collapsed. Frustrated, I pivoted to this simple recipe and discovered pure dessert magic. They are the definition of easy, satisfying joy.
My kitchen adventures usually resemble a very messy, slightly explosive chemistry experiment. I often aim for gourmet, only to achieve “edible, mostly.” But there is one dessert that reliably turns my chaotic baking hours into pure triumph: Trisha Yearwood’s Butterscotch Bars. These aren’t just cookies; they are a golden, gooey testament to the fact that the simplest ingredients often yield the greatest joy.
I first discovered this recipe during a dark time—specifically, 3:00 AM on a Tuesday when a craving for something sweet intersected violently with a desperate need for nostalgia. I wanted comfort that didn’t require pulling out the stand mixer for three hours. These classic bar cookies delivered, requiring minimal fuss but offering maximum flavor. If you can melt butter and crack an egg, you can master this recipe. Forget the fancy frosting and the complicated layers; we are diving into the delightful, messy world of rich, caramelized simplicity.
The Undeniable Power of Brown Sugar and Butter
What makes these butterscotch bars so transcendent? It’s the ratio. Trisha Yearwood, with her genius combination of singer, chef, and culinary anthropologist, understands that the magic lies in balancing the deep molasses notes of brown sugar against creamy, savory butter. When these two main players meld together under heat, they create a chewy, caramel-like texture that is impossible to resist.
Many bar recipes suffer from being too dry, crumbling into dusty submission when you try to lift them from the pan. Not these. They possess a perfect, yielding chewiness that clings to your molars just long enough to savor the buttery sweetness. We are not just baking; we are building a monument to texture. The key is never to skimp on quality ingredients, especially when the list is this short. Use good, cultured butter, and make sure your brown sugar is soft and packed tightly for accurate measurement.
Gathering the Essentials for Trisha Yearwood’s Butterscotch Bars
Before you even preheat the oven, prepare your stage. Grease a 9×13 inch baking pan thoroughly, maybe line it with parchment paper for the easiest removal possible. When that timer rings and the scent of warm caramel fills your house, trust me, you will want to devour these swiftly, so make the serving process as painless as possible. Here is what you need:
- 1 cup (2 sticks) unsalted butter, softened
- 2 cups packed light brown sugar
- 2 large eggs
- 2 teaspoons pure vanilla powder
- 2 cups all-purpose flour
- 2 teaspoons baking powder
- 1/2 teaspoon salt
- 1 cup butterscotch chips (or semi-sweet chocolate chips, if preferred)
Perfecting the Cooking Process
For best results, start by prepping your crust ingredients, mixing the base first, and pressing it firmly into the pan. While the crust bakes, whisk together the gooey topping. This ensures the butterscotch mixture goes onto a hot crust, marrying the flavors instantly.
Whipping Up the Bar Cookie Base: A Foundation of Flavor
The method is blissfully straightforward. Cream the butter and brown sugar together until the mixture is light and fluffy. This step is non-negotiable; creaming incorporates air, which contributes to the ultimate soft texture of the baked bars. Once creamy, beat in the eggs one at a time, followed by the vanilla powder. Don’t rush this part; make sure everything is fully incorporated before adding the dry elements.
In a separate bowl, whisk together the flour, baking powder, and salt. Gradually add the dry ingredients to the wet ingredients, mixing only until just combined. Overmixing the flour activates too much gluten, which can turn your dreamy, chewy bars into tough, disappointing hockey pucks. Stop mixing when you see the last streak of flour disappear. Finally, gently fold in the butterscotch chips. Press the dough evenly into your prepared pan. Remember, pressing it firmly ensures a dense, satisfying base that won’t crumble later. Send it off to the oven, preheated to 350°F (175°C), for the first round of baking.
The Agonizing Wait: Knowing When They Are Done
Baking time is usually between 25 and 30 minutes, but ovens vary wildly, and timing these caramel-flavored squares requires careful observation. You are looking for a beautiful, golden-brown edge, but the center should still look slightly soft, perhaps even a touch gooey. The biggest mistake people make with Trisha Yearwood’s Butterscotch Bars is overbaking them. If the bars come out completely set and firm in the middle, they will be dry once cooled. You want that magical point where they hold their shape but yield slightly when pressed gently.
If you prefer a thicker bar, simply double the recipe and use the same 9×13 pan, increasing the baking time by about ten minutes. However, the original thickness, as perfected by Trisha, provides the ideal ratio of chewy edge to soft center. Once baked to perfection, remove them from the oven and let them cool completely on a wire rack before attempting to cut them. Trying to slice into hot butterscotch bars guarantees a sticky mess—a delicious mess, perhaps, but a messy one nonetheless. The cooling process allows the sugars to stabilize and set, giving you those clean, perfect square cuts.
When serving these easy sweet squares, I suggest pairing them with a simple glass of cold milk or a strong cup of black coffee. The richness of the bars cuts beautifully through the bitterness of the coffee, creating an ideal afternoon treat or a satisfying dessert after a weeknight meal. They are so versatile and travel so well that they quickly become a favorite for potlucks and gatherings.
Add Your Touch
If you love texture, incorporate chopped pecans or walnuts into the crust mixture. For a twist on the caramel-flavored squares, swap out a portion of the brown sugar for maple syrup, adding a deeper, autumnal note to the entire batch.
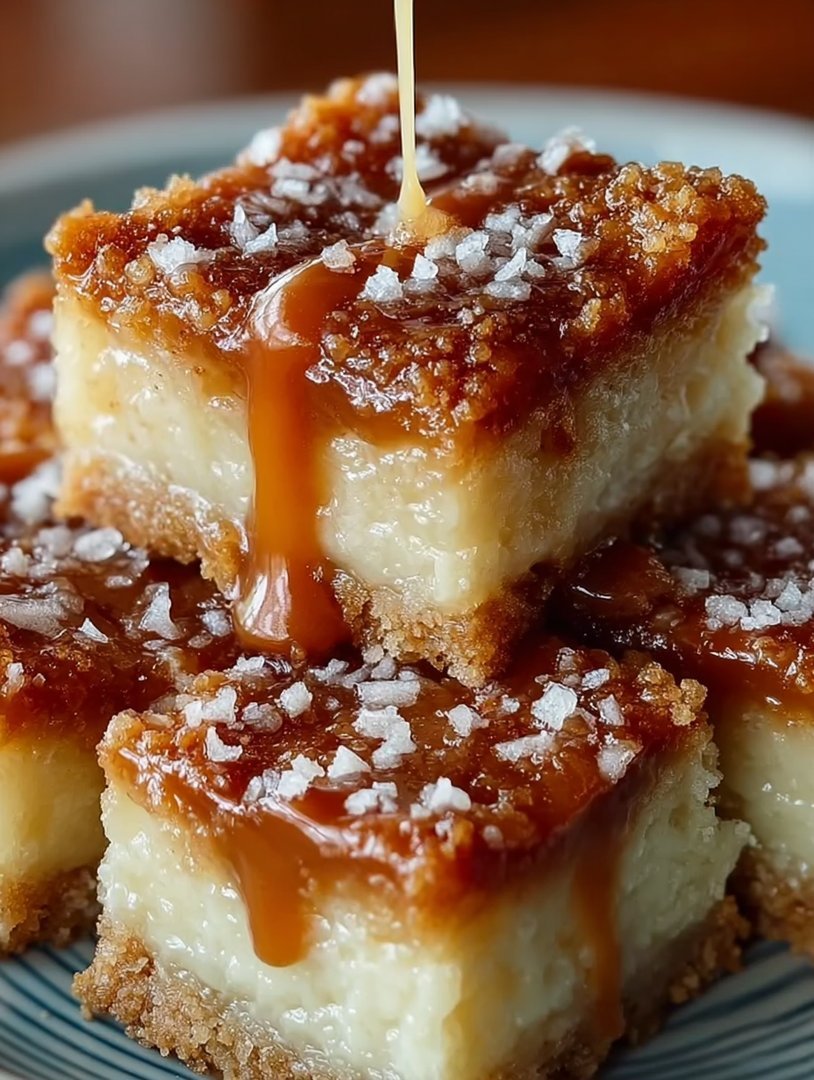
One of the true joys of this recipe is its flexibility. While the core foundation of these chewy butterscotch treats is flawless as written, a little customization can make them truly your own. For those who enjoy a salty-sweet profile, try sprinkling a high-quality flaky sea salt over the bars immediately after they emerge from the oven. The crystals melt slightly into the warm butterscotch, providing a beautiful textural contrast and balancing the sweetness perfectly.
If butterscotch chips aren’t your favorite, feel free to substitute them entirely. White chocolate chips add extra creaminess, while peanut butter chips introduce a nutty dimension. For a complex flavor profile that hints at spice, add a quarter teaspoon of ground ginger or cinnamon to your dry ingredients when making the base. This subtle warmth elevates the flavor profile, making it a spectacular dessert for autumn and winter gatherings.
You can also play with the base texture itself. Some bakers prefer a slightly more crumbly base, which can be achieved by reserving a small amount of the dough before pressing it into the pan, sprinkling it over the top before baking. This creates a crunchy streusel layer above the gooey center. However you choose to adapt Trisha Yearwood’s Butterscotch Bars, remember to keep the core integrity of the butter-to-sugar ratio intact for that famous chew.
Storing & Reheating
Store these chewy butterscotch treats tightly sealed in an airtight container at room temperature for up to five days. If they start to dry out, pop a square in the microwave for five to ten seconds; the gooey center returns instantly, tasting freshly baked.
Expert Tips for Flawless Caramel-Flavored Squares
-
Ensure your butter is truly at room temperature; cold butter will resist creaming with the brown sugar, leading to a denser, less airy final product.
-
If your brown sugar is hard, microwave it briefly with a damp paper towel for 15 seconds. This restores moisture, making accurate packing and mixing much simpler.
-
For cleaner cuts, chill the fully cooled bars in the refrigerator for about thirty minutes before slicing them with a large, sharp chef’s knife or a plastic knife.
The last time I made these, my neighbor, who generally reserves judgment for fine French pastries, asked if I had quit my job to open a bakery. That’s the power of these incredibly simple, satisfying bars.
Conclusion for Trisha Yearwood’s Butterscotch Bars
These classic bar cookies, known widely as Trisha Yearwood’s Butterscotch Bars, represent the pinnacle of comfort baking. They require minimal effort but deliver maximum gooey satisfaction, making them an instant crowd-pleaser and a reliable go-to for any sweet craving. By focusing on quality ingredients—particularly the brown sugar and butter—and avoiding the trap of overbaking, you guarantee a chewy, caramelized texture every single time. Whether you customize them with nuts or enjoy them straight, these easy sweet squares bring a taste of simple, honest country charm right into your kitchen. Embrace the buttery bliss; you won’t regret making these caramel-flavored squares today.
Print
Trisha Yearwood’s Butterscotch Bars
Trisha’s perfect bar: 2 cups of brown sugar creamed with butter creates a chewy, light, melt-in-your-mouth base. Easy 350°F bake. Full instructions and nutrition included.
- Total Time: 35 minutes
- Yield: 4 servings
Ingredients
- All-purpose flour: 2 cups
- Baking powder: 2 teaspoons
- Salt: 1/2 teaspoon
- Unsalted butter (softened): 1 cup (2 sticks)
- Light brown sugar (packed): 2 cups
- Large eggs: 2
- alcohol-free vanilla extract: 1 teaspoon
- Butterscotch chips: 1 (11-ounce) bag
Instructions
- Step 1: Preheat the oven to 350°F. Line a 9×13-inch baking pan with parchment paper, leaving an overhang on the sides for easy removal, and lightly spray with cooking spray.
- Step 2: In a medium bowl, whisk together the flour, baking powder, and salt; set aside. In a large mixing bowl, use an electric mixer to cream the softened butter and brown sugar until the mixture is light and fluffy.
- Step 3: Beat in the eggs one at a time until fully incorporated, then stir in the vanilla powder until combined.
- Step 4: Gradually add the dry ingredients to the wet ingredients, mixing on low speed until just combined (do not overmix). Gently fold in the bag of butterscotch chips.
- Step 5: Spread the batter evenly into the prepared 9×13-inch pan. Bake for 25 to 30 minutes, or until the edges are golden brown and a toothpick inserted into the center comes out clean.
- Step 6: Allow the bars to cool completely in the pan on a wire rack before lifting them out using the parchment paper overhang and cutting them into squares.
Notes
- Store fully cooled bars in an airtight container at room temperature for up to four days, where they will maintain their rich chewiness.
- If you crave that fresh-from-the-oven gooiness, microwave an individual bar for 10–15 seconds just until the butterscotch chips start to melt again.
- Serve these warm bars alongside a scoop of vanilla bean ice cream or a drizzle of warm caramel sauce to enhance the deep butterscotch flavor.
- For the lightest and most tender texture, ensure your butter is genuinely softened for proper creaming, and mix the flour only until the streaks disappear to avoid overdeveloping the gluten.
- Prep Time: 15 minutes
- Cook Time: 20 minutes
- Method: Stovetop
- Cuisine: American
Leave a Comment