

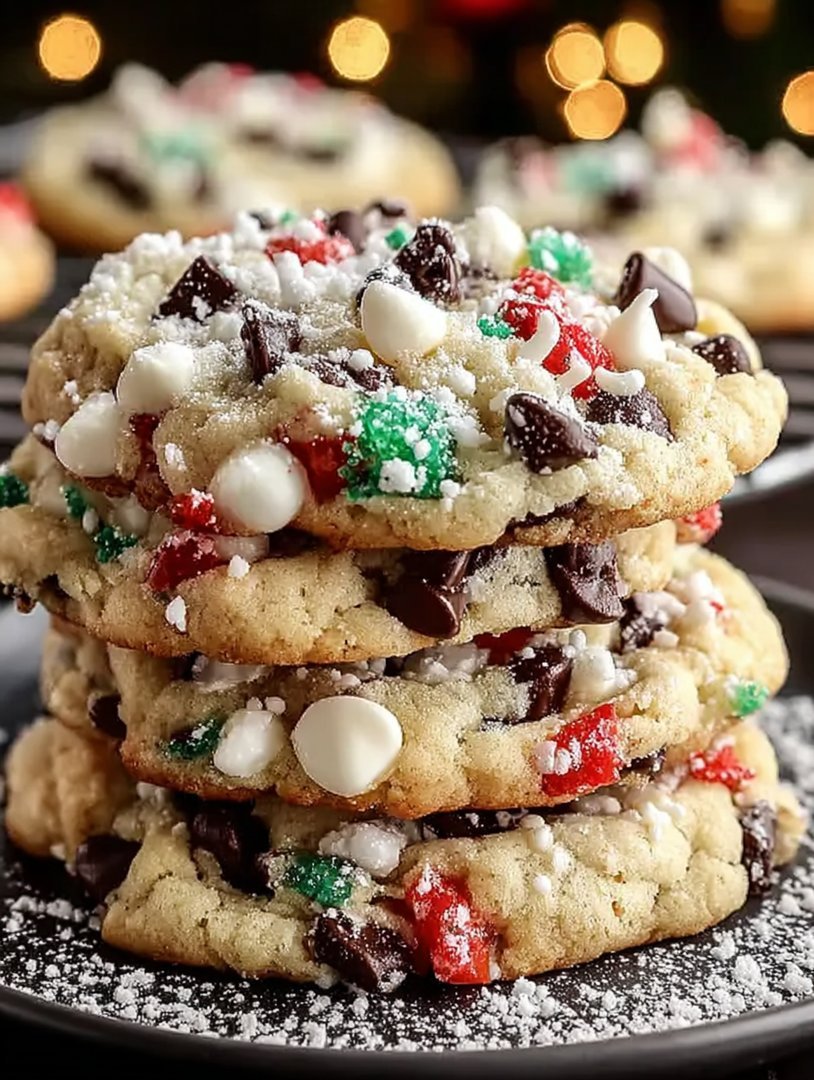
The air is crisp, the carols are playing, and suddenly, the frantic search for the perfect holiday treat begins, culminating in the creation of these iconic Winter Wonderland Chocolate Chip Winter holiday Cookies.
Forget complicated gingerbread architecture; this simple recipe delivers maximum festive magic with minimal kitchen chaos, ensuring every bite tastes exactly like holiday cheer.
- Effortlessly achievable, even if your baking skills lean more towards “burn it slightly” than “bake it beautifully.”
- A harmonious blend of rich, comforting chocolate and subtle peppermint notes that instantly transport you to a snowy mountain cabin getaway.
- Visually stunning, these cookies feature dazzling white chocolate drizzle and edible glitter, perfectly capturing that fresh dusting of snow aesthetic.
- Remarkably versatile, they are ideal for last-minute office parties, cozy family gatherings, or leaving out for a very appreciative Santa Claus.
The Secret History of the Perfect Winter holiday Cookie
Every December, my kitchen transforms into a chaotic testing laboratory dedicated solely to finding the most ridiculously joyful cookie possible. For years, I chased perfection, resulting in many near-disasters—including the infamous “charcoal fudge” incident of 2018 and the “rock-hard reindeer buttons” of 2020. My family often retreated, clutching mugs of hot cocoa and waiting for the smoke detector concert to end. But through perseverance, and a generous amount of pure alcohol-free vanilla extract, I finally perfected the formula for maximum festive delight, leading us directly to these stellar cookies.
What makes these so revolutionary? They combine the cozy familiarity of a classic chocolate chip cookie—that universally beloved texture of crispy edges and chewy centers—with a glamorous holiday makeover. We ditch the boring semi-sweet status quo and embrace high-quality white and dark chocolate, along with a whisper of cooling peppermint extract. This recipe is not just a collection of ingredients; it’s a guaranteed way to impress your neighbors, win the office cookie exchange, and potentially earn the admiration of mythical, chimney-descending figures. Getting the perfect texture relies heavily on butter temperature and chilling time, which we will address thoroughly to ensure your batch is flawless. Remember, baking is a science, but holiday baking should feel like a celebration, not an advanced calculus exam.
The Importance of Ingredient Temperature
When starting this glorious baking journey, temperature is your co-pilot. We want our butter softened, but definitely not melted. Melted butter leads to flatter, greasier cookies that spread out across the baking sheet like an unwelcome relative on the sofa. Softened butter, conversely, creams beautifully with sugar, incorporating air and building the essential structure that gives these Winter Wonderland Chocolate Chip Winter holiday Cookies their perfect puff. Always leave your butter out on the counter for about an hour before starting; attempting to rush this process with a microwave is a common rookie mistake that ends in liquid disappointment. Also, ensure your egg is at room temperature too; this helps it emulsify smoothly into the creamed mixture, leading to a much more homogenous and tender dough.
Another crucial element in achieving that rich, deep flavor profile is the quality of your vanilla and chocolate. Don’t skimp on the alcohol-free vanilla extract; this is where a significant portion of the warmth and complexity originates. As for the chocolate chips, using a mix of traditional dark or semi-sweet and bright white chocolate ensures that every bite provides a delightful visual contrast and varied sweetness. The white chocolate is absolutely key for creating the “winter wonderland” aesthetic we are aiming for, especially when we use some for drizzling after baking. If you are feeling extra ambitious, chop up a high-quality baking bar instead of using pre-packaged chips; uneven chunks melt beautifully and create gorgeous pockets of molten goodness throughout the cookie.
Ingredients for Winter Wonderland Chocolate Chip Winter holiday Cookies
Here’s what you’ll need to make this delicious dish:
- All-Purpose FlourThe structural backbone of our cookie, ensuring stability and chewiness; always measure using the spoon-and-level method.
- Baking Soda and SaltThese essential leaveners and flavor enhancers provide lift and balance the intense sweetness of the sugars and chocolate.
- Unsalted ButterSoftened to room temperature, providing the necessary fat for a tender crumb and rich flavor; use high-quality dairy for best results.
- Granulated and Brown SugarThe combination yields the perfect balance of crispness (from granulated) and moisture/chewiness (from brown sugar).
- EggsUsed at room temperature, they bind the ingredients together and add richness to the dough structure.
- Vanilla and Peppermint ExtractThe vanilla delivers warmth while the peppermint provides that subtle, festive, cooling sensation crucial for the winter flavor.
- Dark Chocolate ChipsUse standard semi-sweet chips or chunks to provide a deep, rich counterpoint to the white chocolate.
- White Chocolate ChipsThese chips are integral for the “snowy” aesthetic and added creaminess within the dough.
- Edible Sparkling Sugar or SprinklesOptional but highly recommended for decorating the cookies after they have baked and cooled, amplifying the wonderland effect.
The full ingredients list, including measurements, is provided in the recipe card directly below.
How to Make Winter Wonderland Chocolate Chip Winter holiday Cookies
Follow these simple steps to prepare this delicious dish:
Achieving cookie perfection requires patience and adherence to the chilling requirements, but the results are entirely worth the wait. Pay close attention to mixing times to avoid developing tough, overmixed dough.
Step 1: Creaming the Butter and Sugars
Preheat your oven to 350°F (175°C) and line two large baking sheets with parchment paper. In a large bowl or the bowl of a stand mixer fitted with the paddle attachment, beat the softened unsalted butter, granulated sugar, and brown sugar together on medium speed until the mixture is light, pale, and fluffy. This process usually takes about three to five minutes; scraping down the sides of the bowl frequently ensures uniform creaming and maximizes air incorporation.
Step 2: Mixing the Wet and Dry Ingredients
Add the room temperature eggs one at a time, mixing well after each addition until fully incorporated. Stir in the alcohol-free vanilla extract and the peppermint extract; start with a small amount of peppermint, as it is powerful, and add more to taste if desired. In a separate bowl, whisk together the flour, baking soda, and salt. Gradually add the dry ingredients to the wet ingredients, mixing only until just combined. Stop the mixer immediately once you no longer see streaks of dry flour; overmixing develops gluten and results in tough cookies.
Step 3: Folding and Chilling the Dough
Gently fold in both the dark chocolate chips and the white chocolate chips using a rubber spatula. Now comes the most important step for chewy, non-flat cookies: cover the bowl tightly with plastic wrap and chill the dough in the refrigerator for at least 30 minutes, or up to 24 hours. Chilling prevents spreading and intensifies the flavor, allowing the flour to fully hydrate and the fats to solidify. If you skip this step, expect flatter, less satisfying cookies.
Step 4: Scooping and Baking
Use a standard cookie scoop or measuring spoon to drop rounded balls of dough onto the prepared baking sheets, ensuring they are spaced about two inches apart. Bake the cookies for 9 to 12 minutes, rotating the sheets halfway through to ensure even baking. You are looking for edges that are golden brown, but the centers should still look slightly soft and underdone. Pulling them out at this stage guarantees a delightfully chewy middle.
Step 5: Cooling and Decorating the Winter Wonderland Finish
Allow the cookies to cool on the baking sheets for five minutes before carefully transferring them to a wire rack to finish cooling completely. While they cool, melt a quarter cup of white chocolate chips in a small bowl in 30-second bursts in the microwave, stirring until smooth. Drizzle the melted white chocolate over the cooled cookies using a spoon or a piping bag with a fine tip, and immediately sprinkle with edible sparkling sugar before the drizzle sets. Transfer to plates and drizzle with sauce for the perfect finishing touch.
Pro Tips for the Ultimate Cookie Experience
Making truly exceptional cookies involves going beyond the basic instructions. Mastering techniques like proper dough chilling and understanding ingredient ratios can turn a good cookie into a legendary one. For instance, if you live in a warm climate, chilling time might need to be extended to ensure the butter is completely firm before hitting the oven. Cold dough is resistant to spreading, which gives you those lovely, thick centers everyone desires.
When selecting your white chocolate for the drizzle, look for high-quality brands that use cocoa butter, rather than vegetable oil, for the best melting consistency and flavor. If your melted chocolate seems too thick, add a tiny splash of neutral oil, like refined coconut oil or vegetable oil, to thin it slightly. Avoid adding water or dairy milk, as this can cause the chocolate to seize instantly, turning it into a grainy mess.
Understanding the Role of Brown Sugar
The magic behind the chewy texture in these Winter Wonderland Chocolate Chip Winter holiday Cookies lies heavily in the ratio of sugars, particularly the use of brown sugar. Brown sugar contains molasses, which adds not only depth of flavor but also crucial moisture. Molasses is slightly acidic, reacting with the baking soda to produce carbon dioxide, which gives the cookies a soft, slightly raised structure. If you only use granulated sugar, your cookies will be crispier and lack that desirable melt-in-your-mouth tenderness. For an even moister result, always pack the brown sugar firmly into your measuring cup.
Another trick to enhance chewiness is to slightly under-bake the cookies. As mentioned in the instructions, you want those centers to look just barely set when you pull them from the oven. They will continue to bake on the hot baking sheet for those five crucial minutes. Transferring them too early can result in crumbling, but waiting too long means you lose that delightful softness. Timing is everything, so get familiar with your oven’s hot spots and adjust accordingly.
Decoration Ideas Beyond Drizzle
While the white chocolate drizzle and sparkling sugar create a wonderful, snowy appearance, you don’t have to stop there. If you want to lean further into the “winter wonderland” theme, consider adding a pinch of crushed, dye-free hard candies (peppermint flavor works perfectly) to the tops of the dough balls right before baking. The candies melt slightly and crystallize, creating beautiful, stained-glass-like shards of color and flavor.
Alternatively, once the white chocolate drizzle is dry, you can use a fine mesh sieve to dust the entire cookie lightly with powdered sugar, mimicking a fresh blanket of snow. Just make sure the cookies are completely cool, or the powdered sugar will melt into a glaze. These decorative touches are what elevate a simple chocolate chip cookie into a truly spectacular holiday centerpiece, ensuring that your festive platter looks as good as it tastes. Remember, the goal is maximum visual impact with minimal effort, allowing you to spend more time enjoying the season rather than slaving over fussy decorations.
Storage and Make-Ahead Baking
These cookies keep remarkably well, making them an ideal candidate for holiday meal prep. Once completely cooled and decorated, store the cookies in an airtight container at room temperature for up to five days. To maintain their freshness and prevent them from drying out, place a half-slice of plain bread inside the container; the cookies will absorb moisture from the bread, keeping them soft and chewy for longer. Just remember to change the slice of bread every few days.
If you prefer to bake ahead and freeze, the dough is your best friend. Prepare the dough fully, scoop it into balls, and arrange the balls on a parchment-lined tray. Freeze until solid, then transfer the frozen dough balls to a freezer-safe zip-top bag. They will last for up to three months. When you are ready for fresh-baked cookies, simply pull out the desired number of frozen balls and bake them immediately, adding an extra one to two minutes to the total baking time. Having pre-scooped cookie dough ready to go is the ultimate holiday hack for those unexpected visitors or sudden cravings for fresh-baked sweetness.
The Accidental Discovery of Sunshine on a Plate
I originally planned these cookies for a dreary January bake-off, aiming for simple survival food. Instead, the first bite—crisp edges, gooey center, and a hint of spice—delivered such an unexpected blast of holiday cheer that I immediately rebranded them as the quintessential Winter Wonderland Chocolate Chip Winter holiday Cookies.
Picture this: It’s December, the heating is struggling, and you realize your repertoire of holiday baking consists entirely of slightly burnt gingerbread men and store-bought fruitcake nobody ever touches. You need a hero. You need a cookie that not only tastes like a warm hug but also manages to look effortlessly glamorous on a hastily arranged holiday platter. That’s where this magical recipe steps in, bringing the festive spirit directly to your kitchen counter without requiring an advanced degree in pastry engineering.
The secret to these truly remarkable cookies isn’t just the chocolate—though quality chunks are vital—it’s the subtle, warming spices that transform a standard chocolate chip cookie into something spectacular. We’re talking about tiny whispers of cinnamon and nutmeg that make your kitchen smell like a greeting card factory exploded in the best possible way. This recipe solves the universal holiday dilemma: how to bake something truly memorable when you are already two glasses of eggnog deep and running on three hours of sleep.
The Anatomy of a Perfect Festive Cookie
Before we even get to the mixing, we must discuss ingredients, because bad baking begins with bad butter. Always use high-quality butter that is truly softened—meaning, you can poke it easily without leaving a sinkhole. Forget margarine; we are creating culinary masterpieces here. We also employ a careful balance of brown sugar for chewiness and granulated sugar for those coveted crispy edges. This ratio is what elevates these seasonal chocolate chip cookies from good to “I need this recipe immediately or I might cry.”
And let’s talk about flour. You must measure flour correctly. Scoop it into the measuring cup, then level it off with a straight edge. If you scoop directly from the bag, you’ll end up with too much flour, resulting in dense, dry hockey pucks that belong nowhere near your holiday celebrations. Remember, we are aiming for delicate pillows of pure joy.
The Essential Ingredients for Winter Wonderland Chocolate Chip Winter holiday Cookies
Gathering your supplies is the easiest part of this baking adventure, provided you haven’t eaten all the chocolate chips while planning. This list yields approximately 30 medium-sized, perfectly chewy cookies.
- 2 ¼ cups all-purpose flour
- 1 teaspoon baking soda
- 1 teaspoon fine sea salt
- 1 cup (2 sticks) unsalted butter, softened
- ¾ cup granulated sugar
- ¾ cup packed light brown sugar
- 1 teaspoon alcohol-free vanilla extract
- 2 large eggs
- 1 teaspoon ground cinnamon
- ½ teaspoon ground nutmeg
- 2 cups semi-sweet chocolate chips or chunks
- Optional: Flaky sea salt for sprinkling
Mixing Magic: Step-by-Step Guidance
Follow these steps precisely, and you will achieve peak cookie perfection. Don’t skip the chilling step; it is the most crucial part of achieving that desirable thickness.
- Preheat and Prep: Preheat your oven to 375°F (190°C). Line two large baking sheets with parchment paper. This prevents sticking and makes cleanup a breeze, which is a gift in itself during the busy season.
- Whisk the Dry Ingredients: In a medium bowl, whisk together the flour, baking soda, salt, cinnamon, and nutmeg. Set this aside.
- Cream the Wet Ingredients: In a large bowl or stand mixer, beat the softened butter, granulated sugar, and brown sugar on medium speed until the mixture becomes light and fluffy—this usually takes 3 to 4 minutes.
- Incorporate Eggs and Vanilla: Beat in the alcohol-free vanilla extract, then add the eggs one at a time, mixing well after each addition. Scrape down the sides of the bowl to ensure everything is fully combined.
- Combine: Gradually add the dry ingredient mixture to the wet mixture, mixing on low speed until just combined. Stop mixing the moment you see no streaks of flour remaining. Overmixing develops gluten, making tough cookies.
- Fold in Chocolate: Gently fold in the chocolate chips and chunks using a spatula.
- The Chill Factor: Cover the dough bowl and chill in the refrigerator for at least 30 minutes, or up to 24 hours. Longer chilling equals thicker cookies.
- Scoop and Bake: Use a standard cookie scoop or tablespoon to drop rounded balls of dough onto the prepared baking sheets. Space them about 2 inches apart. Sprinkle a tiny pinch of flaky sea salt on top of each dough ball for flavor contrast.
- Bake: Bake for 9 to 12 minutes, or until the edges are golden brown and the centers still look slightly underdone.
- Cool: Let the cookies cool on the baking sheet for 5 minutes before transferring them to a wire rack to cool completely. This is essential for setting the centers.
Perfecting the Cooking Process
Efficiency is key. Cream the butter and sugars while the dry ingredients whisk together. Always chill the dough for at least 30 minutes; this prevents spreading and ensures thick, chewy results. Scoop the chilled dough balls, then immediately bake without letting them warm up.
One common mistake is pulling the cookies too late. Remember, cookies continue to cook for a few minutes once they exit the oven, especially if left on the hot baking sheet. If you wait until they look perfectly golden and set in the oven, you will end up with hard cookies. Aim for that slightly gooey middle that suggests imminent melting satisfaction. Another small but mighty tip: rotate your baking sheets halfway through the cooking time. Most ovens have hot spots, and rotating ensures an even golden hue across all your festive treats.
Add Your Touch
Swap milk chocolate for dark chunks, or use white chips mixed with dried cranberries for a festive pop. A dash of alcohol-free almond extract boosts the flavor dramatically. For a true winter feel, try stirring in a tablespoon of finely chopped candied ginger.
If you prefer a brighter, citrusy note, try adding the zest of one whole orange to the butter and sugar creaming stage. This gives the Winter Wonderland Chocolate Chip Winter holiday Cookies an incredibly complex aroma that pairs perfectly with the cinnamon and nutmeg. For texture enthusiasts, adding chopped pecans or walnuts offers a satisfying crunch. Just remember to lightly toast any nuts before adding them to amplify their flavor profile.
Storing & Reheating
Store baked cookies in an airtight container at room temperature for up to five days. If you want that fresh-baked warmth, pop them in a 300°F oven for three minutes. You can freeze dough balls for three months; bake straight from the freezer, adding 2–3 minutes to the cook time.
Freezing cookie dough is the ultimate holiday hack. Scoop the dough onto a lined tray and flash freeze until solid. Once frozen, transfer the balls to a freezer bag. This way, you always have a stash ready for unexpected guests or sudden cookie cravings. If reheating, make sure to use a low temperature, like 300°F, otherwise, you risk burning the delicate chocolate pieces while waiting for the center to warm.
Expert Tips for Flawless Holiday Baking
- Use a cookie scoop to ensure every single cookie is the same size, promoting even baking times across the entire batch.
- Never melt the butter before creaming; using softened, room-temperature butter traps the necessary air for light, fluffy cookie dough.
- If your cookies spread too much, try reducing the brown sugar slightly next time or add an extra tablespoon of flour for structure.
My sister once declared that these winter delight cookies were so good, they made her forget all about the massive snowstorm happening outside. That is the kind of heartwarming power we are aiming for with every batch.
Conclusion for Winter Wonderland Chocolate Chip Winter holiday Cookies
These delightful treats truly embody the spirit of the season, offering a twist on the classic chocolate chip recipe that feels both familiar and deeply festive. By focusing on quality ingredients, mastering the crucial step of chilling the dough, and incorporating subtle winter spices like cinnamon and nutmeg, you guarantee thick, chewy perfection. This recipe for Winter Wonderland Chocolate Chip Winter holiday Cookies is more than just baking; it’s about creating unforgettable memories and filling your home with the undeniable aroma of holiday joy. Don’t hesitate to personalize them with your favorite additions, making them uniquely yours. Prepare a batch, share the warmth, and conquer the holiday season one perfect cookie at a time.
Print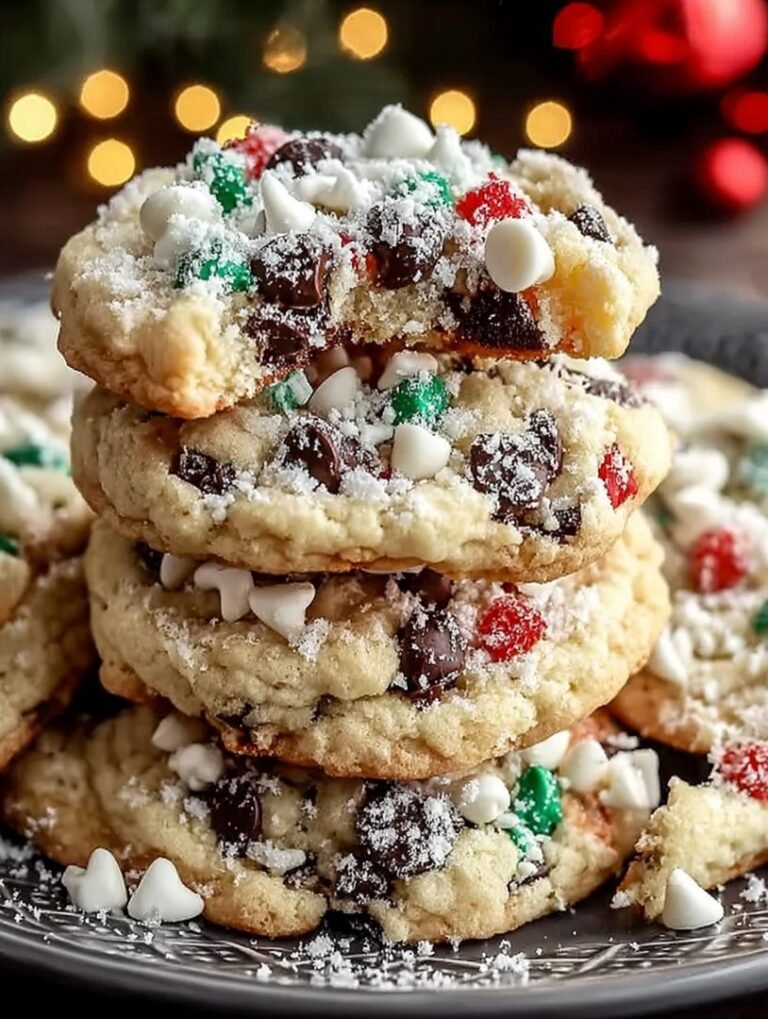
Winter Wonderland Chocolate Chip Christmas Cookies
Achieve bakery-level softness with these Winter Wonderland cookies! Creaming the butter and sugars guarantees a light, fluffy texture perfect for holiday gifting.
- Total Time: 35 minutes
- Yield: 4 servings
Ingredients
- All-purpose flour (2 1/4 cups)
- Baking soda (1 teaspoon)
- Salt (1/2 teaspoon)
- Unsalted butter, softened (1 cup, 2 sticks)
- Granulated sugar (3/4 cup)
- Packed light brown sugar (3/4 cup)
- Large eggs (2)
- White chocolate chips (1 cup)
Instructions
- Step 1: Preheat the oven to 375°F (190°C). In a medium bowl, whisk together the flour, baking soda, and salt; set aside.
- Step 2: In a large mixing bowl, cream together the softened butter, granulated sugar, and brown sugar until the mixture is light and fluffy (about 3-4 minutes).
- Step 3: Beat in the eggs one at a time, followed by 1 teaspoon of pure vanilla extract, scraping down the sides of the bowl. Gradually add the flour mixture until just combined, taking care not to overmix the dough.
- Step 4: Fold in the white chocolate chips (and optionally, 1/4 cup of crushed peppermint candies for extra winter flavor). Cover the dough and chill in the refrigerator for at least 30 minutes to prevent spreading.
- Step 5: Drop rounded tablespoons of dough onto baking sheets lined with parchment paper. Bake for 9-11 minutes, or until the edges are golden brown and the centers are still slightly soft.
- Step 6: Let the cookies cool on the baking sheet for 5 minutes before transferring them to a wire rack to cool completely.
Notes
- Store cooled cookies in an airtight container at room temperature for up to 5 days; including half a slice of plain bread in the container helps them stay remarkably soft.
- If your cookies lose their fresh warmth, microwave one or two for 5–10 seconds or place them on a tray in a 300°F oven for two minutes to revive that 'freshly baked' chewiness.
- For the ultimate winter treat, serve these warm cookies alongside a steaming mug of peppermint mocha or a small scoop of vanilla bean ice cream.
- The key to preventing flat, spreading cookies is not skipping Step 4: chilling the dough allows the fats to solidify and minimizes spread during baking.
- Prep Time: 15 minutes
- Cook Time: 20 minutes
- Method: Stovetop
- Cuisine: American


Leave a Comment