

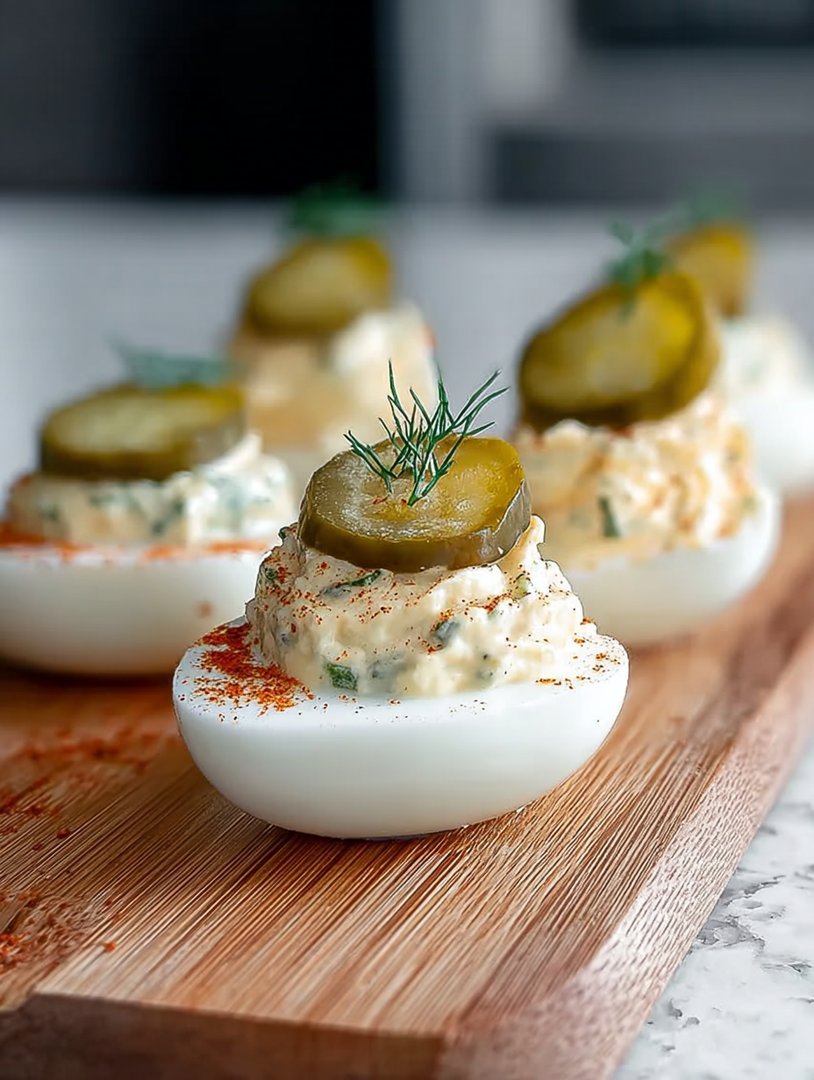
Forget those bland, pale appetizer plates that whisper “mediocrity” at every potluck. We’re elevating the humble deviled egg into a crunchy, tangy masterpiece that unapologetically screams flavor.
If your heart belongs to all things briny and bold, get ready for the ultimate party snack that is impossible to resist: the incredibleZesty Dill Pickle Deviled Eggs.
- Experience a flavor explosion that perfectly balances the creamy richness of the yolk with an unforgettable, powerful pickle punch that surprises everyone.
- The vibrant green pickle relish and crisp garnish transform these eggs into a visual centerpiece everyone will absolutely rave about at the next gathering.
- This recipe simplifies the deviled egg process, making it a quick and stress-free option for even the most novice kitchen adventurers seeking big flavor payoff.
- They are the ideal addition to holiday picnics, summer barbecues, or simply enjoyed as a satisfying, protein-packed afternoon snack when you crave tang.
Why You Need More Pickle in Your Life
I have a long-standing feud with boring deviled eggs. You know the kind—the ones that look perfectly fine but taste like pale, lukewarm sadness and barely registered on the flavor meter. For years, I dutifully made them for family functions, only to watch them languish next to the chip bowl, ignored and unloved. It was a tragedy of appetizer proportions. I knew there had to be more to life than the standard mayonnaise-and-mustard ratio.
The turning point came during a summer barbecue where I accidentally spilled pickle brine into my filling bowl. Instead of panicking (which I usually do when faced with accidental cooking mishaps), I tasted it. And oh, what a revelation! That sharp, briny kick was exactly what the creamy yolk needed to come alive. It was the birth of the brine revolution, leading directly to these magnificent Zesty Dill Pickle Deviled Eggs.
These aren’t just eggs with pickles tossed on top; this recipe incorporates the pickle flavor deep into the creamy core. We harness the power of both finely chopped dill pickles and a splash of the precious pickle juice to ensure every bite delivers maximum tang. The dill pickle component cuts through the richness of the yolk and mayonnaise blend, preventing that heavy, cloying feeling that often plagues traditional recipes. If you’ve ever found yourself drinking pickle juice straight from the jar (don’t lie, we’ve all been there), this recipe is your destiny. It captures the essence of that salty, sour addiction and packages it neatly into an elegant, two-bite snack perfect for any occasion that demands flavor and a little bit of fun.
Mastering the Foundation: The Perfect Egg
The foundation of any spectacular deviled egg is, obviously, a perfectly cooked and, more importantly, perfectly peeled hard-boiled egg. Nothing is more frustrating than spending ten minutes gently coaxing shell fragments off a delicate egg white, ultimately destroying the beautiful canvas upon which your dill pickle masterpiece is meant to shine. A successful deviled egg starts with flawless preparation, ensuring the texture is just right—firm, yet creamy, without that dreaded gray ring around the yolk.
The Secret to Shell-Peeling Success
Contrary to popular belief, fresh eggs are terrible for peeling. If possible, use eggs that are at least a week old. The pH changes slightly as they age, making the membrane separate more easily from the shell. The cooking method also matters immensely. Place your eggs gently into a saucepan and cover them with cold water, ensuring the water level is about one inch above the tops of the eggs. Bring the water to a rolling boil over high heat. Once boiling rapidly, turn off the heat immediately, cover the pan with a lid, and let the eggs sit, undisturbed, for precisely 10 to 12 minutes.
The second critical step is the immediate transfer to an ice bath. This drastic temperature change halts the cooking process, preventing the yolk from overcooking, and causes the egg structure to contract slightly away from the shell. Leave them in the ice bath for at least five minutes until they are fully cooled. When ready to peel, gently tap the egg on a hard surface, rolling it lightly to crack the entire shell structure before peeling under a small stream of cold running water. This technique results in smooth, flawless whites ready for filling.
Achieving Peak Zestiness: The Perfect Filling Blend
Once you have your twelve perfectly peeled eggs, slice them neatly in half lengthwise. Gently scoop the yolks into a medium mixing bowl. This is where the magic happens and where the “zesty” component of the Zesty Dill Pickle Deviled Eggs truly comes to life. Mash the yolks thoroughly with a fork until they are completely smooth and crumb-free. The goal is creamy uniformity, eliminating any lumpy texture that might spoil the presentation.
Now, introduce the wet ingredients. We want a rich base that doesn’t overpower the brine. Use a high-quality, full-fat mayonnaise for maximum creaminess, combined with a sharp Dijon mustard for a little necessary bite. The real flavor comes from the finely chopped dill pickle relish and the pickle juice. Start with a conservative amount of juice; you can always add more, but you cannot take it away. Mix the filling vigorously until it is light, fluffy, and perfectly incorporated. Taste and adjust the seasoning, focusing on salt, black pepper, and perhaps a pinch of smoked paprika for a subtle, earthy undertone that complements the tangy dill beautifully.
Presentation and Clever Variations
The beauty of this appetizer lies not just in the flavor, but in the effortless elegance of the presentation. While you could simply spoon the filling into the egg white halves, using a piping bag with a star tip takes these Zesty Dill Pickle Deviled Eggs from picnic snack to gourmet hors d’oeuvre. This technique creates beautiful swirls of filling, providing both visual appeal and making the eggs much easier to transport and serve neatly. Before piping, ensure your filling is completely smooth and lump-free, which will prevent clogs in your piping tip.
Elevating the Garnish Game
Garnish is essential for texture and visual contrast. We utilize the dill pickle in three ways: chopped into the filling, reserved as crisp slices for decoration, and fresh dill fronds for color. Place a small, thin slice or chip of pickle directly on top of the piped filling. Then, sprinkle generously with freshly chopped fresh dill. This gives a powerful aromatic punch right before consumption. For those who want to amplify the heat, a pinch of cayenne pepper mixed into the filling, or a light dusting of chili flakes on top, provides a pleasant surprise without undermining the core dill flavor. Always remember to keep your finished platter chilled until the last moment; no one appreciates a warm deviled egg.
Ingredients for Zesty Dill Pickle Deviled Eggs
Here’s what you’ll need to make this delicious dish:
- Large EggsUse twelve large eggs, preferably those that are at least one week old, as they peel much easier after cooking.
- MayonnaiseChoose a good quality, full-fat mayonnaise to ensure the filling achieves maximum richness and creamy texture.
- Dijon MustardA small amount of sharp Dijon mustard is essential to provide that classic tang and depth without overpowering the dill flavor.
- Dill Pickle RelishUse a high-quality, chunky dill pickle relish, ensuring it is drained slightly before mixing it into the filling.
- Dill Pickle JuiceThis brine is the secret weapon that provides the intense “zesty” element and helps achieve the perfect consistency for piping.
- Smoked PaprikaA small amount adds a beautiful color and a subtle smoky earthiness that complements the acidity of the pickles.
- Fresh DillUsed both for flavoring and as an aromatic, visual garnish to complete the presentation of the eggs.
- Salt and Black PepperEssential seasonings; be sure to taste and adjust carefully, as the pickle juice already adds significant salinity.
The full ingredients list, including measurements, is provided in the recipe card directly below.
How to Make Zesty Dill Pickle Deviled Eggs
Follow these simple steps to prepare this delicious dish:
Step 1: Preparing and Peeling the Eggs
Place the eggs in a large pot and cover with cold water. Bring to a rolling boil over high heat. Remove from the heat, cover, and let stand for 10 minutes. Immediately transfer the eggs to an ice bath and chill completely, about 5 minutes, before peeling carefully.
Step 2: Halving and Separating Yolks
Slice each cooled egg neatly in half lengthwise. Gently scoop the cooked yolks into a medium mixing bowl, ensuring the egg white halves remain intact for later filling. Set the egg white halves aside on a clean platter.
Step 3: Creating the Zesty Filling
Use a fork or potato masher to mash the yolks until they are perfectly smooth and crumb-free. Add the mayonnaise, Dijon mustard, dill pickle relish, and 2 tablespoons of the dill pickle juice to the bowl. Mix thoroughly until the filling is light and fluffy, adding a small splash more pickle juice if needed for a smoother consistency.
Step 4: Seasoning and Flavor Adjustment
Stir in the smoked paprika, salt, and black pepper. Remember that the pickle juice adds saltiness, so season carefully. Taste the mixture and adjust seasonings or add more relish to reach your desired level of dill and tanginess.
Step 5: Piping the Filling
Transfer the yolk mixture to a piping bag fitted with a star tip (or use a large resealable bag with the corner snipped off). Pipe the filling attractively into the reserved egg white halves, creating a consistent swirl or dome in each cavity.
Step 6: Chilling and Garnishing
Cover the finished eggs loosely and refrigerate for at least 30 minutes to allow the filling to set slightly. Just before serving, garnish each Zesty Dill Pickle Deviled Egg with a small pickle slice and a sprinkle of fresh chopped dill.
Transfer to a chilled serving tray and serve immediately, keeping them cool for the best flavor and texture.
The Accidental Discovery of Sunshine on a Plate
I used to think deviled eggs were destined for polite mediocrity at picnics. That changed when a jar of spicy dill pickles accidentally tipped into my mixing bowl. The result? A vibrant, creamy explosion that elevated the humble appetizer into a must-have party star. This happy accident is how the glorious Zesty Dill Pickle Deviled Eggs were born.
For decades, the humble deviled egg has been a staple, yet often overlooked, appetizer at gatherings. It sits quietly on the platter, patiently waiting for someone to acknowledge its creamy, predictable nature. But let’s be honest, traditional deviled eggs, while fine, rarely spark joy. They lack that necessary punch, that little culinary wink that makes a dish truly memorable. I decided enough was enough. I wanted an egg that tasted like summer, a bite that delivered a perfect salty, savory, and tangy slap of flavor.
The journey to perfecting these magnificent finger foods started, as all great culinary adventures do, with a little chaos. I was rushing to make a batch of standard deviled eggs for a last-minute gathering when I realized I was out of sweet relish. Panic set in. My eye caught a jar of my grandmother’s intensely flavored, crunchy dill pickles sitting on the counter. Necessity, as they say, is the mother of invention, or in this case, the mother of the Zesty Dill Pickle Deviled Eggs.
Unlocking the Flavor Secrets of Zesty Dill Pickle Deviled Eggs
The secret to transforming the standard recipe into a rave-worthy appetizer lies not just in adding pickles, but in incorporating the brine itself. The pickle liquid is liquid gold; it brings the necessary acid and savory depth that regular vinegar simply cannot replicate. Achieving the perfect balance between the creamy yolk mixture and the sharp dill flavor is an art form, but one that is surprisingly easy to master once you understand the key components.
The Essential Components: Ingredients That Pop
While the process is straightforward, the quality of your ingredients makes all the difference. We need twelve perfectly cooked egg halves, but the magic happens in the filling. Forget generic mayonnaise; opt for a high-quality brand or even better, use a creamy Greek yogurt blended with mayonnaise for extra tang. The mustard selection is also vital; Dijon or a slightly spicy brown mustard adds complexity without overwhelming the delicate dill notes. But the real star, aside from the eggs, is the pickle.
Use a crisp, deeply flavored dill pickle—not the mushy kind destined for fast-food burgers. We are looking for texture and flavor saturation. Mince the pickles finely enough to integrate smoothly into the yolk mixture, but leave just enough texture so your guests get a delightful crunch with every bite. Fresh dill is non-negotiable; dried herbs just won’t cut it here. A sprinkle of smoked paprika, rather than plain paprika, adds a layer of smoky sophistication at the end.
The Ratio for Maximum Zing
Deviled eggs are often ruined by too much mayonnaise, turning them into a sloppy mess. Our goal is a stiff, yet pipeable filling. For every six egg yolks, you typically need about three tablespoons of mayonnaise, one tablespoon of mustard, and crucially, one to two teaspoons of the pickle brine. Start with one teaspoon of brine and taste; you can always add more tang, but you can’t take it away without sacrificing volume. This small adjustment ensures your Zesty Dill Pickle Deviled Eggs have that satisfying, tangy finish without being soupy.
Perfecting the Cooking Process
Start by boiling and chilling the eggs immediately for effortless peeling. While the eggs cool, mince the pickles and fresh dill. This allows you to smoothly scoop, mix the creamy filling, and pipe the beautiful mixture immediately after peeling.
The cooking process for the eggs themselves is the most critical step. Overcooked eggs result in that dreaded green ring around the yolk, a sign of sulfurous compounds reacting with iron. To avoid this kitchen catastrophe, use the cold-start method: place eggs in a pot, cover with cold water, bring to a rolling boil, immediately cover the pot, turn off the heat, and let them sit for exactly nine to ten minutes. When the timer dings, plunge them instantly into an ice bath to halt the cooking process. This thermal shock makes the shells practically jump off the egg whites.
The Tangy Twist: Crafting the Filling
Once you’ve separated the yolks, it’s time to unleash the zest. Place the yolks into a medium bowl. I highly recommend using a fork or a sturdy rubber spatula to mash them; avoid the food processor unless you want a paste suitable for spackling. Mash them until completely smooth, ensuring no lumps remain. This smooth base is essential for a silky final texture.
Next, introduce the creamy components. Add the mayonnaise, mustard, minced dill pickles, and fresh dill. Now comes the moment of truth: the pickle brine. Pour in that glorious liquid and mix everything together thoroughly. Taste and adjust. Does it need a little more kick? Add a tiny dash of cayenne pepper. Does it feel flat? A few grains of fine sea salt will wake up the flavors.
If you’re serving these at home, a simple spoon delivery is perfectly acceptable. However, if you want that “wow factor” for your Zesty Dill Pickle Deviled Eggs, invest in a piping bag and a star tip. Fill the bag and pipe the mixture back into the empty egg white cavities. This technique not only looks professional but also makes the filling appear lighter and fluffier, maximizing the savory aroma before the first bite.
Add Your Touch
If you need a richer profile, swap mayonnaise for sour cream or Greek yogurt. For extra heat, incorporate a pinch of cayenne or a dollop of horseradish. Consider topping with smoked paprika or crispy fried shallots instead of standard paprika.
Customizing these tangy pickle eggs is part of the fun. If you want a protein boost, finely dice some smoked turkey breast or chicken and fold it into the mixture. For an intense savory depth, try incorporating a teaspoon of finely grated parmesan cheese, which melts invisibly into the yolk but provides a fantastic umami boost. Vegetarians can experiment with roasted red pepper flakes or even a splash of lemon juice instead of brine if they prefer a brighter, citrusy note over deep pickle flavor.
Pro Tips for the Ultimate Dill Pickle Eggs
- Always use eggs that are a week or two old; fresh eggs notoriously resist peeling, causing frustrating yolk craters.
- For a professional presentation, use a piping bag and a star tip to deliver that perfect, fluffy swirl of the dill pickle filling.
- Never blend the filling; a slight texture from the minced pickles and yolks provides a far superior, more satisfying mouthfeel than a smooth paste.
I served these dill pickle beauties at a summer potluck once. My neighbor, who claimed to hate deviled eggs, ate five, then sheepishly begged for the recipe before the main course was served.
Storing & Reheating
Store the finished Zesty Dill Pickle Deviled Eggs in an airtight container in the refrigerator for up to two days. Do not freeze. If preparing ahead, store the filling and whites separately, combining them just before serving for optimal freshness.
Because the filling is heavily dairy-based, these must be kept cold. If you are taking them to an event, make sure you use an insulated cooler with ice packs beneath the serving platter. Deviled eggs don’t “reheat” well, as they are meant to be served chilled. However, if the filling slightly loses its shape after chilling, you can always quickly whisk it again before piping it back into the egg white halves.
Conclusion for Zesty Dill Pickle Deviled Eggs
The journey from basic appetizer to this vibrant, zesty dill pickle sensation proves that sometimes the simplest ingredients hold the biggest surprises. These Zesty Dill Pickle Deviled Eggs are not just a snack; they are a flavorful statement piece for any gathering. They offer the perfect balance of creamy texture and sharp tang, ensuring they disappear fast. Embrace the brine, perfect the piping, and watch your guests delight in this unexpected twist on a classic. Get ready for your new favorite appetizer obsession!
Print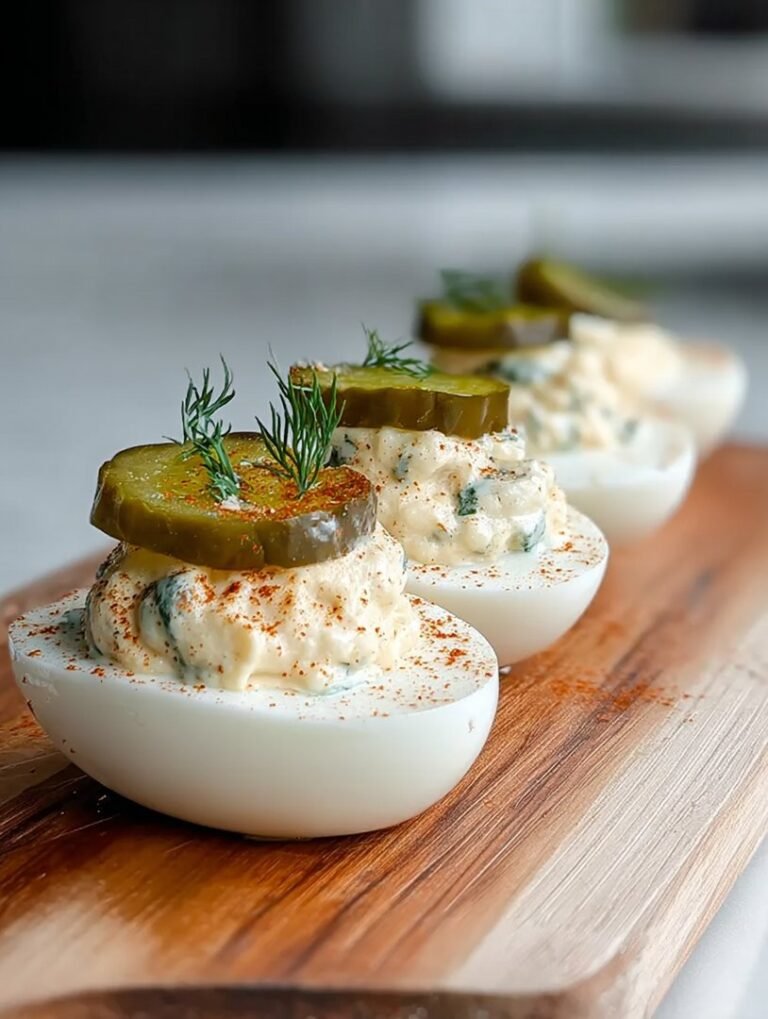
Zesty Dill Pickle Deviled Eggs
Tangy dill brine meets creamy yolks! These Deviled Eggs offer a bright, zesty crunch from minced pickles and Dijon mustard. A party favorite! Full recipe instructions and nutritional details included.
- Total Time: 35 minutes
- Yield: 4 servings 1x
Ingredients
- 8 large eggs, hard-boiled and peeled
- 1/3 cup mayonnaise (or Greek yogurt for lighter filling)
- 1/4 cup finely minced dill pickles (drained)
- 2 tablespoons dill pickle juice/brine
- 1 teaspoon Dijon mustard
- 1 tablespoon fresh dill, finely chopped, divided
- 1/2 teaspoon kosher salt
- 1/4 teaspoon black pepper
Instructions
- Step 1: Carefully slice the peeled, hard-boiled eggs in half lengthwise. Gently scoop the yolks into a medium mixing bowl, taking care to leave the egg white halves intact on a platter or serving dish.
- Step 2: Use a fork to thoroughly mash the egg yolks until they form a fine crumble. Add the mayonnaise, Dijon mustard, dill pickle juice, kosher salt, and black pepper to the bowl. Stir vigorously until the mixture is smooth and creamy.
- Step 3: Gently fold in the finely minced dill pickles and half of the fresh chopped dill (reserving the remaining dill for garnish). Taste the yolk mixture and add more salt, pepper, or pickle juice to achieve the desired level of tang and seasoning.
- Step 4: Transfer the yolk mixture into a piping bag fitted with a star tip, or use a small spoon. Fill the hollowed-out egg white halves evenly with the prepared zesty pickle mixture.
- Step 5: Cover the deviled eggs lightly and chill them in the refrigerator for at least 30 minutes prior to serving to allow the flavors to meld and the filling to set slightly.
- Step 6: Just before serving, garnish each deviled egg with a light sprinkle of the remaining fresh chopped dill.
Notes
- Keep these highly perishable deviled eggs covered tightly in the refrigerator and plan to enjoy them within two days of preparation for optimal food safety and flavor.
- When adjusting the filling in Step 3, use the pickle brine sparingly; adding it drop by drop helps achieve the perfect tanginess and creamy consistency required for smooth piping.
- For an elegant presentation, serve the deviled eggs on a platter lined with fresh arugula, or pair their zesty flavor with salty kettle chips for a satisfying crunch.
- To ensure maximum freshness and prevent the egg whites from drying out, prepare the filling up to a day ahead and store it separately, only piping the mixture into the halves a few hours before serving.
- Prep Time: 15 minutes
- Cook Time: 20 minutes
- Method: Stovetop
- Cuisine: American


Leave a Comment