
Remember that time Aunt Mildred tried to bake a Yule log and it looked suspiciously like a collapsed beaver dam? Forget those structural disasters. This year, we’re making tiny, perfect jewels of confectionery art: the ultimatewinter holiday Tree Cake Truffles.
These bite-sized wonders combine fluffy cake crumbs, creamy binder, and a dazzling green shell, making them the easiest (and tastiest) way to spread cheer without needing a structural engineering degree or hours of stressful decorating.
- Effortlessly transform leftover cake scraps into professional-looking treats, perfect for even the most frantic December schedules and last-minute holiday parties.
- Experience the rich, decadent flavor of vanilla cake combined with smooth cream cheese frosting in a single, irresistible bite that everyone will crave.
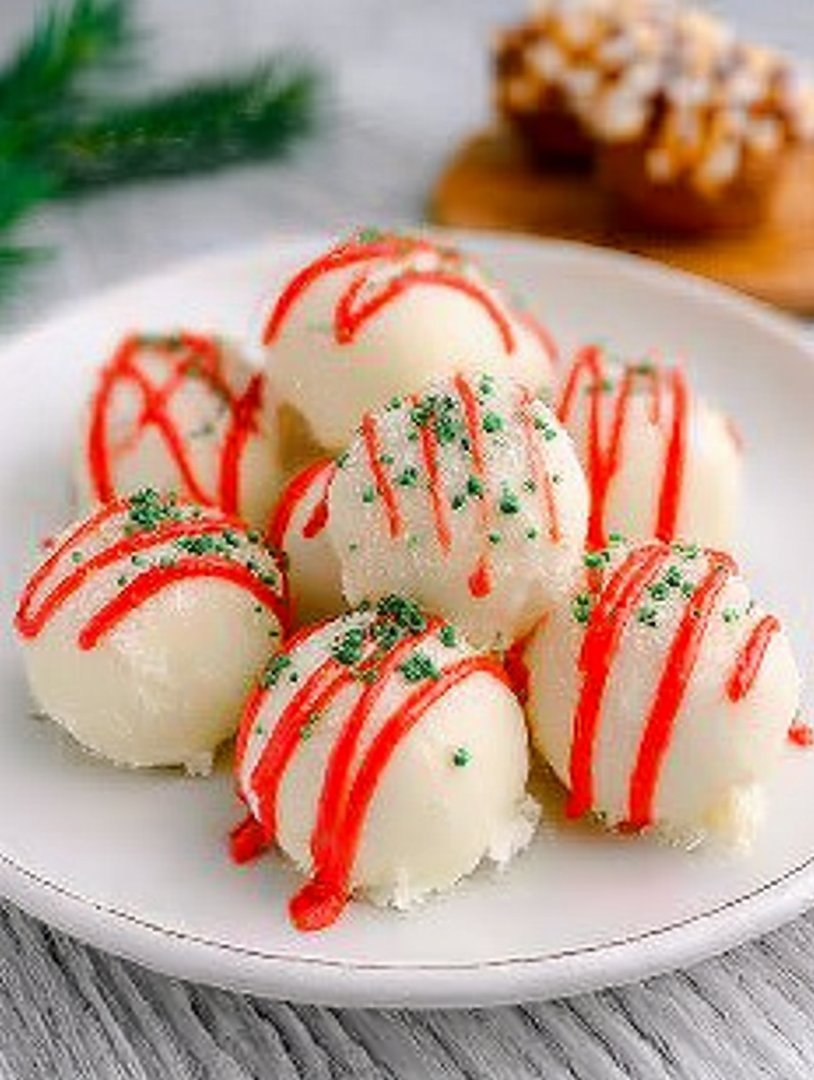
- Achieve spectacular visual appeal by creating miniature edible Year-End Celebration trees dusted with edible shimmer and charming colorful sprinkles for a dazzling effect.
- Easily customize the flavor base and exterior decorations to match any seasonal theme or personal flavor preference, making them truly versatile party snacks.
Why You Need winter holiday Tree Cake Truffles
The holiday season often feels like a competitive sport disguised as merriment. You want to bring that show-stopping dessert, but you also want to enjoy your own party—not spend the whole evening supervising a temperamental oven. This is where the magic of the cake truffle steps in, saving your sanity and guaranteeing applause. These treats require zero baking commitment once you have your cake base ready, making them an ideal project for those days when the festive chaos has completely taken over your kitchen. They are inherently forgiving. Did your cake fall flat? Perfect. Did you accidentally use too much frosting? No problem, they will just be extra creamy. The cake truffle doesn’t judge; it simply asks to be molded and dipped.
The concept of rolling a dessert ball might seem simple, but the impact these little tree-shaped delights have on a holiday spread is huge. They signal careful effort without the actual labor intensity usually associated with complicated Year-End Celebration sweets. Guests love the individual portion control, allowing them to sample one or six without committing to a giant slice of cake. Plus, let’s be honest, watching a room full of adults delicately attempt to eat a miniature festive tree without getting green chocolate on their nose is entertainment in itself. These are not merely desserts; they are conversation starters wrapped in a candy coating, and they are essential for your festive repertoire.
The Anatomy of the Perfect Truffle
Achieving the perfect texture in these delicious holiday dessert balls is a balance between structure and moisture. We start with a baked vanilla cake, crumbled fine enough to resemble sand, ensuring there are no large pockets remaining. This fine crumble is crucial because it allows the binding agent—typically softened cream cheese or rich buttercream—to fully integrate, creating a dense yet pliable dough. The mixture should feel like edible playdough: firm enough to hold its shape when rolled, but soft enough that it melts beautifully in your mouth upon eating. If the mixture is too dry, your trees will crumble; too wet, and they will slouch sadly on the dipping rack. Temperature control is your biggest ally here; chilling the mixture firmly ensures a smooth rolling process and prevents the coating from cracking when dipped into the warm melted candy.
When selecting the cake base, stick with simple, robust flavors like vanilla or red velvet, as they provide a clean canvas for the exterior chocolate coating. Avoid overly spicy or fruity cakes that might clash with the sweet exterior. The real flavor punch comes from the quality of your coating. We use bright green candy melts specifically engineered for easy dipping and a quick, glossy set. This ensures thewinter holiday Tree Cake Truffleslook as professional as they taste, delivering that instant pop of color required for a truly magnificent seasonal display.
Ingredients for winter holiday Tree Cake Truffles
Here’s what you’ll need to make this delicious dish:
- Baked CakeUse approximately four cups of crumbled vanilla or white cake, ensuring it is cooled completely before crumbling so it mixes well with the cream cheese binder.
- Cream CheeseUse one block (8 ounces) of full-fat cream cheese, softened completely to room temperature for smooth and uniform mixing with the cake crumbs.
- Powdered SugarA small amount of powdered sugar helps thicken the mixture and provides additional sweetness, adjusting to your specific cake base.
- Alcohol-Free Vanilla ExtractUse pure alcohol-free vanilla extract to enhance the overall flavor profile of the cake dough, adding depth and warmth to the finished truffle.
- Green Candy MeltsEssential for the vibrant tree color, choose high-quality green candy melts designed for dipping, as they melt smoothly and set quickly with a firm shell.
- White Coating or ChocolateA small amount of white coating is used for creating the edible “snow” or garland decorations on the finished trees.
- Assorted SprinklesPurchase various small, festive sprinkles like red balls or gold stars to decorate the trees, mimicking ornaments and tree toppers.
- Lollipop Sticks or ToothpicksThese are necessary for dipping the cake balls efficiently and also serve as the central structure before the truffle sets.
The full ingredients list, including measurements, is provided in the recipe card directly below.
How to Make winter holiday Tree Cake Truffles
Follow these simple steps to prepare this delicious dish:
-
Step 1: Prep the Cake Base and Create the Dough
Crumble the cooled cake thoroughly into a very fine powder using your hands or a food processor until no large chunks remain. In a large bowl, combine the cake crumbs, softened cream cheese, powdered sugar, and alcohol-free vanilla extract. Use a spatula or stand mixer on low speed to mix until a dense, uniform dough forms that pulls away cleanly from the sides of the bowl. If the dough seems sticky, add a tablespoon more of powdered sugar until it reaches that edible playdough consistency.
-
Step 2: Shape and Chill the Truffle Bases
Line a baking sheet with parchment paper. Scoop about 1.5 tablespoons of the mixture and roll it quickly into an oval shape, which will serve as the base of the cone-shaped tree. Immediately place these shapes onto the lined baking sheet. Once all bases are rolled, insert a lollipop stick about halfway into the flat end of each truffle. Place the entire tray into the refrigerator and chill for at least two hours, or until the truffles are completely firm, which prevents them from falling apart when dipped.
-
Step 3: Melt and Prepare the Green Coating
Melt the green candy melts according to the package directions, either using a double boiler or microwaving in 30-second intervals, stirring vigorously between each session until completely smooth. The consistency should be fluid enough to easily coat the truffle but not so thin that it runs clear. If the coating is too thick, stir in a teaspoon of neutral vegetable oil or specialized dipping oil to thin it slightly. Pour the melted coating into a deep, narrow mug for easier dipping.
-
Step 4: Dipping and Shaping the Holiday Truffles
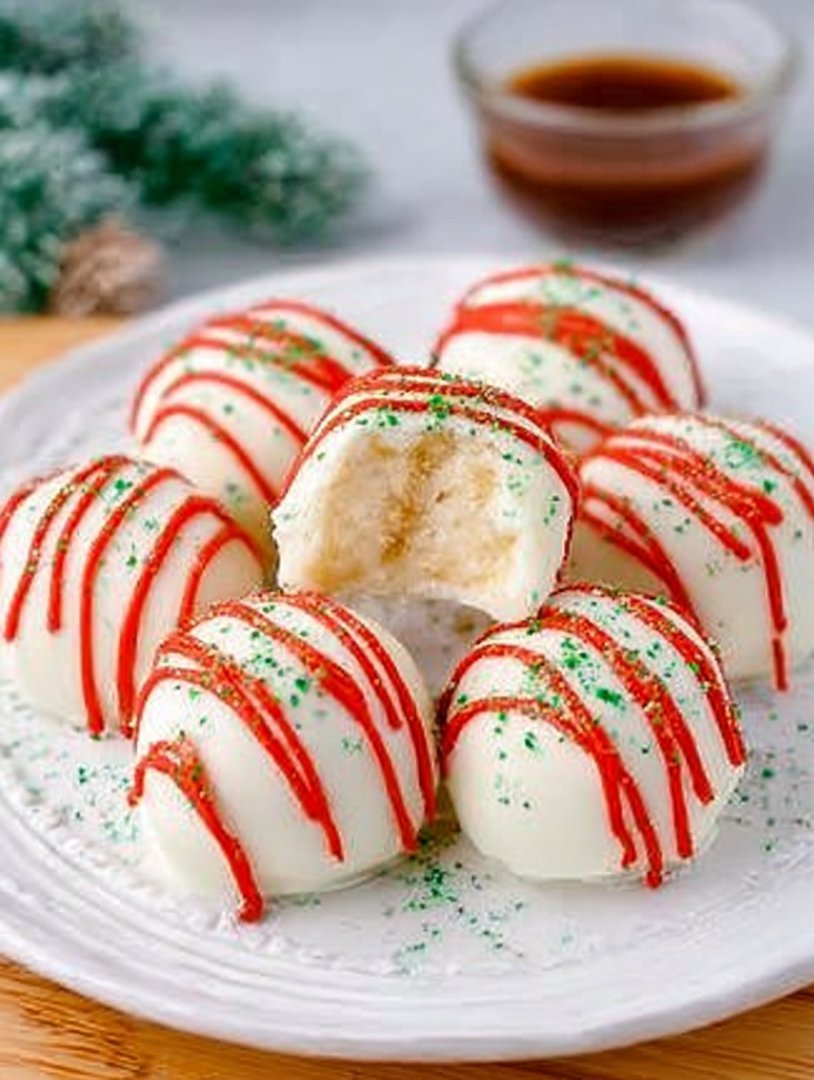
Carefully dip one chilled cake truffle into the green coating, holding it by the stick. Tap the stick gently against the side of the mug to allow excess coating to drip off, ensuring a smooth finish. While the coating is still wet, quickly use a toothpick or small offset spatula to lightly score vertical lines around the oval shape, pulling the coating slightly outward at the bottom to create the appearance of pine needles and the cone shape of a tree. Immediately apply your chosen festive sprinkles before the coating sets.
-
Step 5: Final Set and Decorating Touches
Place the dipped truffles upright in a foam block or tall glass while the coating finishes setting. Once the green coating is completely dry (this takes about 10–15 minutes), melt the white coating. Using a fork or piping bag fitted with a very small tip, drizzle the white coating over the green trees to mimic snow or tinsel. Allow the final decorations to set completely before removing the sticks for serving or packaging.
Transfer to a decorative platter and enjoy the delighted reactions from your guests as they bite into these beautiful festive treats.
Tips and Tricks for Truffle Triumph
Successfully creating beautiful, crack-free cake truffles hinges on a few crucial details that professional bakers swear by. Firstly, the temperature of your cake dough must be absolutely frigid before dipping. If the truffles are even slightly warm, the hot candy coating will cause the cake mixture to expand, leading to unsightly cracks as the coating cools. If you find your truffles are cracking, return them to the freezer for 15 minutes before continuing.
Secondly, always use a dedicated candy coating or compound chocolate instead of standard baking chips. Baking chips contain emulsifiers that can seize or become too thick when melted, making dipping impossible. Candy melts are formulated to maintain a smooth, liquid texture, guaranteeing a flawless, glossy finish. If you must use regular chocolate, ensure you temper it correctly, but for simplicity and reliability, stick to the melts.
Finally, practice the tapping technique described in the instructions. After dipping the truffle, hold it upside down and tap the stick against the edge of the coating container. This removes excess coating and prevents the dreaded “foot” or puddle that forms at the base of the truffle when too much coating pools on the parchment paper. Mastering this tap ensures a sleek, professional look for every single one of your delightful tree-shaped treats.
Decorating for Maximum Festive Cheer
The decoration is where these holiday cake balls truly transform from simple sweets into miniature works of art. The secret to achieving the convincing “tree” shape lies in manipulating the coating before it sets. Immediately after dipping the oval cake ball, you must act fast. Use the tip of a clean toothpick to drag small lines downward from the top to the base of the truffle. This creates texture that resembles pine needles. Since the cake is oval, placing it upright automatically gives it that desirable conical shape.
When adding sprinkles, do not wait until the batch is dipped. Dip one truffle, immediately apply the sprinkles (use tweezers for perfect star placements!), and then move on to the next. For the white “tinsel,” ensure the white coating is slightly thicker than the green coating you used for dipping. Load a small amount onto the tines of a fork and quickly flick your wrist over the truffles to create delicate, random strands of edible garland. This adds dimension and contrasts beautifully with the deep green, elevating the visual appeal of these festive gems dramatically.
Frequently Asked Questions about Festive Truffles
How far in advance can I make winter holiday Tree Cake Truffles?
You can prepare these truffles up to one week in advance. Store the finished truffles in an airtight container in the refrigerator, separating layers with parchment paper to prevent them from sticking or damaging the delicate coating.
What can I use if I don’t have lollipop sticks for dipping?
If you don’t have lollipop sticks, sturdy toothpicks or even the tines of a small fork can work in a pinch. However, for structural integrity during the shaping and dipping process, a small skewer works best. Ensure whatever you use is long enough to hold the truffle without your fingers touching the hot coating.
Why is my candy coating cracking after it sets?
Cracking usually happens because of a significant temperature difference between the chilled truffle dough and the warm coating. Ensure your truffle bases are completely frozen, and try cooling your melted coating slightly (it should still be liquid, but not piping hot) before dipping, allowing the transition to be less dramatic.
Alternatively, if the dough mixture was too crumbly or dry, it might expand slightly as it warms up inside the coating, causing the shell to fracture. Always ensure your initial cake dough is sufficiently moist and well-bound.
Perfecting the Cooking Process
Achieving the perfect truffle consistency requires sequence management. Bake and cool the cake first, then immediately crumble and mix the cake dough. Chill the formed tree shapes thoroughly before preparing the candy melt coating to ensure they maintain their sharp, festive form during dipping.
Add Your Touch
Swap chocolate cake for ginger spice cake for a warm flavor profile. Use cranberry or raspberry jam mixed into the frosting for a fruity surprise center. Instead of green, use white coating and sprinkle with coconut flakes for stunning ‘snow-covered’ trees. You can even use small wafer cones dipped in chocolate for a crunchy tree trunk.
Storing & Reheating
Store these finished treats in an airtight container in the refrigerator for up to one week. Since these are served chilled, no reheating is needed. If serving at a party, take them out 15 minutes before presentation to allow the coating to soften slightly for the best texture.
My first attempt at these trees was a disaster; the chocolate seized, and the shapes looked more like mossy rocks than evergreens. My friend laughed until she cried, then told me to melt the coating over hot water instead of directly in the microwave. That simple tip revolutionized my truffle game.
Chef’s Tips for Truffle Triumph
-
Always use cold truffle dough when dipping; the temperature difference makes the coating set faster, preventing slippage and ensuring a crisp, smooth outer shell.
-
If your candy melts are too thick for easy dipping, add a tiny bit of refined coconut oil—never water—to thin the mixture for a flawless, professional finish.
-
After mixing the cake dough, chill it briefly before shaping. This prevents the warmth of your hands from making the mixture sticky, allowing you to create sharp tree points.
The Quest for the Perfect Festive Treat
Every winter holiday season, I pledge to myself: this year, I will not succumb to the stress of baking a six-layer monstrosity that nobody actually eats. I want charm, efficiency, and a dessert that looks like it took a professional elf two days to create, but in reality, took me two hours and a decent podcast. Sound familiar? That’s how I discovered the undisputed champion of easy, adorable holiday desserts: the cake truffle.
A Little Cake, A Lot of Cheer
There is something inherently joyful about a bite-sized dessert. It gives you permission to indulge without the commitment of a full slice of cake. But standard round truffles felt a little, well,standardfor the most wonderful time of the year. We needed something that screamed ‘festivity’ from the dessert table. That’s why we shape them into tiny, delightful evergreens—the ultimatewinter holiday Tree Cake Truffles. They are moist, decadent, and ridiculously easy to customize.
Forget battling sticky gingerbread dough or wrestling with temperamental yeast. These treats are fundamentally just cake crumbs and frosting, held together by sheer willpower and a deep freeze. Even if you completely incinerated the cake base (which, let’s be honest, we’ve all done), the process of crumbling it up and mixing it with frosting completely resurrects it. This recipe is the ultimate culinary second chance.
Gathering Your Festive Arsenal
Ingredients for the Decadent Base
The beauty of the cake truffle is its flexibility. You can use a boxed cake mix or your favorite homemade recipe. For a rich base, I usually opt for classic dark chocolate or velvety red velvet.
- 1 standard 9×13 inch baked chocolate or vanilla cake (cooled)
- 1 container (16 ounces) pre-made vanilla frosting, or equivalent homemade batch
- 1 teaspoon alcohol-free vanilla extract (optional, for flavor depth)
- 1/4 teaspoon fine salt (to balance sweetness)
The Evergreen Exterior and Decorations
This is where the magic happens and our treats transform into true seasonal icons. Ensure you melt your chocolate coatings slowly to prevent burning or seizing.
- 1 bag (12 ounces) bright green candy melts or white chocolate mixed with natural green food coloring (gel preferred)
- 1 cup assorted winter holiday sprinkles (stars, spheres, or sanding sugar)
- 1/4 cup tiny yellow star sprinkles (for the tree topper)
- Short pretzel sticks or small edible wafer cones (for the tree trunks)
- A small amount of vegetable oil or refined coconut oil (to thin the coating, if needed)
Shaping the Winter Holiday Tree Cake Truffles
Step 1: Crumbly Perfection
First, ensure your cake is completely cool. Using your hands or a food processor, crumble the entire cake into fine, uniform crumbs. This step is crucial. You want the texture to resemble coarse sand, not gravel. Transfer the crumbs to a very large mixing bowl.
Next, gently introduce the frosting. Start with about two-thirds of the container, mixing thoroughly. You might not need all the frosting. The goal is a dough-like consistency that holds its shape when squeezed but isn’t overly sticky or greasy. If the mixture is too dry, add frosting one tablespoon at a time until perfect. If it’s too wet, toss in a tablespoon of cocoa powder or powdered sugar to stabilize it.
Step 2: Forming the Evergreens
This is the fun part, though perhaps slightly messy. Scoop out tablespoon-sized portions of the cake mixture. Instead of rolling them into traditional balls, we need to sculpt them into cones. Start with a ball, then pinch and roll one end to create a pointed tip, leaving a flat bottom. Think of tiny, squat ice cream cones or miniature pyramids. These shapes make the most adorablewinter holiday Tree Cake Truffles.
Place the shaped cones onto a baking sheet lined with parchment paper. Insert a pretzel stick (or your chosen trunk) about halfway into the flat base of each tree. If you plan to serve them standing upright without sticks, skip this step. Refrigerate the truffles for at least 30 minutes, or until they are very firm. This hardening prevents them from collapsing during the coating process.
Step 3: The Green Dip
Melt the green candy melts according to the package directions. Use a double boiler or microwave on 50% power, stirring every 30 seconds. If the melted coating seems too thick, add a teaspoon of vegetable oil to thin it slightly. Consistency is key here; you need a smooth, flowing chocolate for a clean finish.
Hold the chilled truffle by its pretzel stick. Dip the entire cake cone into the green coating, ensuring complete coverage. Gently tap the stick against the edge of the bowl to allow excess coating to drip off. The cleaner the drip, the smoother the tree’s surface.
Step 4: Festive Finishing Touches
Immediately after dipping, while the coating is still wet, decorate your trees. Roll the bottom edge in sanding sugar for a ‘snow’ effect, or sprinkle with colored edible beads. Carefully place a tiny yellow star sprinkle right on top of the pointy tip. Work quickly, as the cold cake ball will set the chocolate rapidly.
Place the finished winter holiday treats back onto the parchment-lined sheet. Allow them to set completely at room temperature or chill them briefly in the refrigerator before serving. They make truly impressive edible decorations.
Frequently Asked Questions About Cake Truffles
Can I freeze the finished winter holiday Tree Cake Truffles?
Yes, you absolutely can! Once the coating is completely set, place the truffles in a single layer in an airtight container. They freeze beautifully for up to three months. Thaw them overnight in the refrigerator before serving.
What is the best type of cake to use for this recipe?
Any dense, non-crumbly cake works well. Pound cake, red velvet, or dense chocolate cake are excellent choices because they hold their shape firmly once mixed with frosting. Avoid very light, airy sponge cakes.
How can I make the green color vibrant without using artificial coloring?
Achieving a bright green can be tricky. You can mix finely ground, freeze-dried spinach powder (it has no detectable flavor in this quantity) into white chocolate melts, or purchase naturally colored green candy melts.
What if my truffle mixture is too greasy?
If your mixture feels greasy, it usually means you used too much frosting or the cake itself was high in butter. Add a few tablespoons of powdered sugar or cocoa powder to absorb the excess moisture and firm up the dough.
Why did my coating crack after chilling?
Cracking occurs when the outer chocolate coating sets too fast or too cold compared to the cake ball inside, creating internal tension. Ensure your cake balls are chilled but not frozen solid, and avoid extreme temperature changes when moving them from the fridge to room temperature.
Why These Festive Tree Truffles Rule the Dessert Table
These petite, conical treats are more than just cake; they are tiny vessels of festive joy. They require minimal actual cooking, maximize decorating fun, and deliver a significant “wow” factor with minimal effort. Whether you are hosting a grand party or simply looking for a fun kitchen project with children, mastering the festive tree truffle recipe ensures you have a gorgeous, delicious centerpiece that proves sometimes, the best desserts come in the smallest, prettiest packages.
Plus, let’s be honest, standing these little trees up on a platter makes the whole table look instantly more professional. Go forth and conquer your winter baking list with these effortless, elegant, and entirely adorable little treats!
Every year, I declare I will make perfectly symmetrical, magazine-worthy holiday desserts. And every year, about three hours into December’s kitchen chaos, I realize my ambitions exceed my abilities. Last season, I attempted gingerbread house architecture and ended up with something that looked suspiciously like a collapsed ski lodge. That’s when I pivoted to the perfect solution for high-impact, low-stress festive baking: cake truffles.
These adorable, bite-sized treats require no structural engineering, minimal baking skill, and maximum decoration fun. We’re talking about the ultimate party centerpiece that looks complicated but is deceptively simple. If you can crumble a cake and melt some chocolate, you can conquer these delightfulwinter holiday Tree Cake Truffles. Get ready to impress your guests and maybe even win the annual “Most Adorable Dessert” award (a highly coveted, imaginary award in my house).
The Magic Behind Festive Cake Truffles
Gathering Your Simple Ingredients
The beauty of cake truffles is their flexibility. You can use leftover cake or bake a fresh batch, but the crucial component is the ratio of cake to frosting. This mixture creates the dense, pliable dough perfect for shaping. We rely on classic vanilla or chocolate cake and rich vanilla frosting to bind it all together. This approach ensures maximum flavor with minimum fuss, allowing even novice bakers to achieve stunning results.
For the Cake Base
- 1 standard box of vanilla cake mix (prepared according to package directions)
- 1 container (16 ounces) of vanilla frosting
- 1 teaspoon pure alcohol-free vanilla extract
For the Coating and Decorating
- 12 ounces green candy melts or white chocolate mixed with green food coloring
- 2 tablespoons coconut oil (for thinning the coating)
- Festive edible star sprinkles
- Various holiday nonpareils and sprinkles
- Small pretzel sticks (for the trunk) or gluten-free alternative
Baking, Crushing, and Mixing the Cake Dough
Start by baking your cake and letting it cool completely. This step is non-negotiable; warm cake crumbles make for a greasy dough that won’t hold its shape. Once cooled, turn that beautifully baked cake into dust. Seriously, you want fine crumbs—the finer, the smoother your resulting truffle will be. Use a fork or, if you’re feeling aggressive, pulse it briefly in a food processor until it resembles sand.
Now, it’s time to introduce the frosting. Scoop the frosting into the bowl of cake crumbs and mix until a sticky, moldable dough forms. You want the consistency of playdough—firm enough to hold its shape, but soft enough to work with. If it feels too dry, add a tiny bit more frosting; if it’s too wet, add a few more spoonfuls of crushed cake or powdered sugar. This is where the magic happens, transforming simple ingredients into the base for our adorable winter dessert.
Shaping and Chilling Your Holiday Treats
Creating the Iconic Tree Shape
To achieve the perfect Year-End Celebration tree silhouette, we need to create two main shapes: the base sphere and the pointed top. Start by rolling the dough into small, evenly sized balls, about 1 inch in diameter. This uniformity ensures they look neat when assembled. Once rolled, place them on a parchment-lined baking sheet.
Next, gently pinch one side of the ball and taper it upwards, forming a cone or pyramid shape. Use your fingers to smooth out any cracks. Don’t worry about perfection yet; the chilling process will lock the shape in. When all your little trees are formed, insert a small segment of a pretzel stick into the base, pushing it about halfway in to serve as the tree trunk and a handle for dipping. If you are not using pretzel sticks, you can use a lollipop stick for dipping instead. Chill the shaped cake trees in the refrigerator for at least two hours, or in the freezer for 30 minutes. They must be very cold before dipping, otherwise they will fall apart in the warm coating.
Dipping and Decorating Magic
This is where our festive cake pops truly come to life. Melt your green candy melts or chocolate according to the package directions, adding coconut oil to thin it slightly. This ensures a smooth, glossy coating that avoids clumpy textures. Dip each chilled cake tree fully into the melted coating, tapping off the excess against the side of the bowl. The rapid temperature change between the cold truffle and the warm coating helps the chocolate set quickly.
Immediately after dipping, while the chocolate is still wet, decorate! Place a star sprinkle right on top of the pointiest part of the tree. Add tiny holiday nonpareils or sprinkles to mimic ornaments. You must move fast during this stage; if the chocolate sets, your decorations won’t stick. Once decorated, place the finishedwinter holiday Tree Cake Trufflesback on the parchment paper and allow them to fully set at room temperature or in the refrigerator before serving. They make truly spectacular edible decorations.
Conclusion for winter holiday Tree Cake Truffles
These adorablewinter holiday Tree Cake Trufflesprove that the most impressive desserts often require the least amount of effort. By combining cake crumbs and frosting, you create a dense, flavorful base perfect for shaping into festive designs. Remember the essential steps: ensuring the cake is fully cooled before mixing, chilling the tree shapes thoroughly before dipping, and decorating immediately while the coating is wet. These simple cake pops offer a delicious, stress-free way to bring cheer to your seasonal table. They are bite-sized perfection ready to delight guests of all ages at your next celebration.
Print
winter holiday Tree Cake Truffles
These festive Tree Truffles deliver rich, fudgy holiday bliss using only vanilla cake and smooth frosting. Bake the base, then blend and roll into decadent no-bake treats perfect for parties.
- Total Time: 35 minutes
- Yield: 4 servings 1x
Ingredients
- 1 box (15.25 oz) vanilla or white cake mix
- 1 large egg
- 1 cup water (or as directed on cake mix)
- 1/3 cup vegetable oil
- 1 tub (16 oz) vanilla or cream cheese frosting
- 1 teaspoon almond paste
- 24 oz white chocolate melting wafers (divided)
- Green gel food coloring and assorted holiday sprinkles
Instructions
- Step 1: Prepare and bake the cake according to the directions on the box (using the cake mix, water, oil, and egg). Once baked, let the cake cool completely on a wire rack.
- Step 2: Crumble the cooled cake into a very fine crumb using your hands or a food processor. In a large bowl, combine the cake crumbs, the entire tub of frosting, and the almond paste until a uniform, moldable dough is formed.
- Step 3: Roll the mixture into 1-inch balls, ensuring they are firm and smooth. Place the truffles on a parchment-lined baking sheet and freeze them for a minimum of 30 minutes to firm up for dipping.
- Step 4: Melt 20 oz of the white chocolate melting wafers according to package instructions (in the microwave or double boiler). Stir in the green gel food coloring vigorously until a vibrant "tree green" is achieved. Keep the remaining 4 oz of white chocolate reserved for drizzling.
- Step 5: Remove the chilled truffles from the freezer. Dip each ball entirely into the green chocolate coating, allowing excess to drip off. Immediately place on the parchment paper and decorate generously with holiday sprinkles before the coating sets.
- Step 6: Once the green coating is dry, melt the remaining 4 oz of white chocolate. Drizzle the white chocolate sparingly over the "tree" truffles to resemble snow, then allow the truffles to fully set at room temperature or in the refrigerator before serving.
Notes
- Store truffles in an airtight container in the refrigerator for up to one week; allow them to sit out at room temperature for 15 minutes before serving for the best, soft interior texture.
- For the most luxurious flavor, allow the truffles to come to a cool room temperature before enjoying, as this softens the frosting interior and enhances the subtle almond paste notes.
- For a charming presentation, serve the truffles nestled in miniature cupcake liners and arrange them on a tiered platter dusted lightly with powdered sugar to resemble a snowy forest display.
- If your melted green chocolate feels too thick for dipping, stir in half a teaspoon of vegetable oil to improve the consistency, but always ensure the cake balls are deeply frozen before dipping to prevent cracking or crumbling.
- Prep Time: 15 minutes
- Cook Time: 20 minutes
- Method: Stovetop
- Cuisine: American
FAQs
How do I prevent my winter holiday Tree Cake Truffles from crumbling during dipping?
The key to stable cake truffles is temperature and density. First, ensure your cake mixture is dense and pliable, almost like clay, not overly wet or greasy. Second, you must chill the formed trees thoroughly—at least two hours in the refrigerator or 30 minutes in the freezer is essential. Dipping a very cold truffle into slightly warmed coating causes the exterior to set quickly, trapping the cake structure inside. Also, ensure your dipping coating is not excessively hot, as this can melt the cake dough instead of coating it successfully. This preparation ensures your festive shapes remain intact while dipping.
Can I prepare the cake dough for these festive treats ahead of time?
Absolutely! Preparing the cake truffle dough ahead of time is a fantastic way to streamline your holiday baking schedule. Once you have mixed the crumbled cake and frosting, the dough can be stored in an airtight container in the refrigerator for up to three days. When you are ready to shape the winter holiday Tree Cake Truffles, simply let the dough soften slightly at room temperature for about 15 minutes before rolling and shaping. This flexibility allows you to focus on the fun decorating aspects closer to your event date without rushing the preparation.
What alternatives can I use for the green candy coating?
If you prefer not to use candy melts, you have several excellent alternatives for coating your holiday cake treats. You can use standard white baking chocolate combined with a few drops of natural green food coloring—ensure the color is oil-based if using standard chocolate, as water-based colors will cause the chocolate to seize. Alternatively, for a different flavor profile, you could dip the truffles in dark chocolate and then use powdered green tea (matcha) mixed with powdered sugar to create a vibrant green dusting or drizzle effect. This technique offers an earthy contrast to the sweet cake interior for unique holiday dessert balls.
How long do winter holiday Tree Cake Truffles last, and how should I store them?
Properly stored, these adorable holiday desserts will last quite a while, making them ideal for large gatherings. If kept in an airtight container at room temperature, they are usually good for about 3 days. However, for maximum freshness and stability, especially if your kitchen is warm, storing them in the refrigerator extends their shelf life to about one week. You can also freeze undecorated cake truffles for up to two months; just thaw them overnight in the refrigerator before dipping and decorating to maintain the best quality and presentation.


Leave a Comment